Adventures In Stamping: zebra mani

Hello my beauties! Happy Sunday! I wanted to post this earlier but it's still in time for this Sunday's challenge. I haven't done the challenges for two weeks because my nails broke and I didn't have the appropriate plates. But I really wanted to get back in the game. If you don't know what I'm talking about, it's this facebook group where we have a theme every week and we stamp accordingly. There's also a lot of talking there about stamping, nail art and nail polish in general. So you must join in because it's an awesome community! Ok, on to the nails!


This week's theme was black and white. Well, I realized it's not easy to do a black and white mani! White is not forgiving at all if you do any mistakes and black is a very messy color. I wanted to do a houndstooth pattern but I don't have a plate and there was no way of me finding the Konad plate in town although I tried. So I went with the less original zebra. There will sure be a lot of zebras this Sunday on the group. 


My base color is Farmec 50 and the stamping color is China Glaze Liquid Leather. I'm so happy to have found a good black for stamping! The plate is m69 from Born Pretty. Sadly, my top coat totally smudged it. These photos are all before top coat. I'm beginning to think that I need to get Seche Vite for nail art. The other top coats all drive me crazy with smudging. I also have some new plates on the way and I'm very excited! There will sure be a stamping galore when those arrive!


Victorian Wall Paper

I'm enjoying using my stamping plates and now I'm obsessed with collecting them.  The ladies over at  Facebook Adventures in Stamping are enablers.  After wearing Sinful Colors Nail Junkie matted for one day I was ready to do some stamping.


I'm loving my latest plate that I purchased DRK-A.  It's large enough to cover my nail beds.  I'm also in love with Sally Hansen Color Quick Nail Color Pens.  I don't like their brushes, but they are awesome for stamping. The one I used is Gold Chrome.


I like how the glitter is peeking through the design.  It looks like an old Victorian wall paper pattern.

I sealed it with Seche Vite Topcoat


Do you collect stamping plates?  Are you hooked on stamping?


Pin It

Until next time please have a great nail polish day. (✿◠‿◠) Share/Bookmark

Lynnderella - Heart Strings

I have a super special Lynnderella to show today.  This is Heart Strings, which was gifted by Lynnderella and made it's way to me thanks to the lovely Kristy from the Polish Haven. Thank you both!

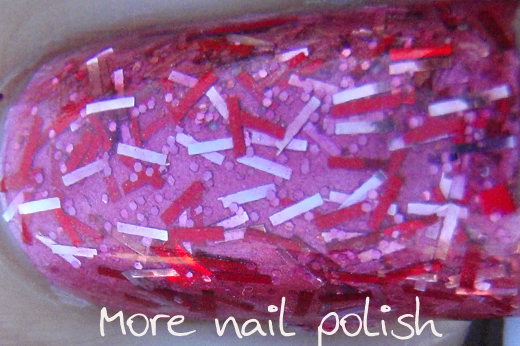
Heart Strings is a light pink jelly base, with both pale pink and red metallic bar glitter and small pale pink hexes.  Bar glitter can be a little tricky to apply, cause it likes to sit sideways and curl upwards.  So I find the best solution is, after you have applied the second coat, wait until it is touch try, but still squishy, then press down any bits that stick up and smoosh them into the soft lacquer.  Also, if there are any string bits that hang past the tip of your nail, either pull then off or push the back so they aren't to close to the tip.

I also noticed a few rouge pieces of glitter on my nail that came out of this bottle, but I don't know if they are part of the polish or just special bits of love that accidentally make their way in.  The ones I'm specifically talking about are the large red square and purple square that are both on my pinky, and the small red square on my ring finger. Hummmmm?!?


This was two coats of Heart Strings layered over one coat of Revlon Rose Chrome (a rather ancient pre-2000 chrome polish).  I used three layers of top coat, just to make sure there were no string bits sitting up.

Here is a bonus picture of Revlon Rose Chrome, one coat on its own.


I don't wear pink polish very often, but this one really caught me by surprise.  The layering combo was perfect for me, I never thought a chrome under the glitter would have looked so awesome.  I'm looking forward to wearing this combo again.

Illamasqua Strike

Hello lovely readers! I hope you are enjoying a well needed rest this weekend! I went to see The Hunger Games last night and it was pretty good. Still the book is a lot better. I can't wait to read the other two but I know that if I start one I won't put it down until I finish it, so I'm waiting for some more free time to do that. I have something amazing to show you today! 

Illamasqua Strike, indoors, artificial light
I've been a bad blogger, I know! I have kept this beauty from you for almost two weeks. Truth is I didn't have much time to edit pictures and I wasn't too happy with my short nails, so I needed time to adjust. Nevertheless, I think this looks amazing on short nails. Just the pop of color they need to look pretty! 

Illamasqua Strike in the sun
This polish is very hard to describe. I would say it's a turquoise frost that looks more blue or more green depending on the light. There's also a secret about this polish. It has tiny shimmer particles that only come out to play in the sun. I've tried to capture these but failed miserably. You can still catch a glimpse of the sparkliness in the sun pictures. 

Illamasqua Strike in the sun
Application is not very hard, thanks to the amazing formula. I did two coats to make it fully opaque. You might end up with some brush strokes but I don't mind those. I used the "last stroke in the middle of the nail" method to minimize the brush strokes. 

Illamasqua Strike in direct artificial light
So you can see from my pictures that this looks more green in artificial light and more blue in natural (sun) light. I also stamped some butterflies after one day but didn't like them too much so I didn't do any photos. I really need to work on my stamping skills. Placing small designs on the nail is much harder than it seems! 

Illamasqua Strike indoors, artificial light
I would really like to thank the amazing polish fairy that made it possible for this polish to reach me! I think this is such a classic and a must have for every turquoise lover out there! 


Related Posts Plugin for WordPress, Blogger...