Showing posts with label Review. Show all posts

Illamasqua Strike

Hello lovely readers! I hope you are enjoying a well needed rest this weekend! I went to see The Hunger Games last night and it was pretty good. Still the book is a lot better. I can't wait to read the other two but I know that if I start one I won't put it down until I finish it, so I'm waiting for some more free time to do that. I have something amazing to show you today! 

Illamasqua Strike, indoors, artificial light
I've been a bad blogger, I know! I have kept this beauty from you for almost two weeks. Truth is I didn't have much time to edit pictures and I wasn't too happy with my short nails, so I needed time to adjust. Nevertheless, I think this looks amazing on short nails. Just the pop of color they need to look pretty! 

Illamasqua Strike in the sun
This polish is very hard to describe. I would say it's a turquoise frost that looks more blue or more green depending on the light. There's also a secret about this polish. It has tiny shimmer particles that only come out to play in the sun. I've tried to capture these but failed miserably. You can still catch a glimpse of the sparkliness in the sun pictures. 

Illamasqua Strike in the sun
Application is not very hard, thanks to the amazing formula. I did two coats to make it fully opaque. You might end up with some brush strokes but I don't mind those. I used the "last stroke in the middle of the nail" method to minimize the brush strokes. 

Illamasqua Strike in direct artificial light
So you can see from my pictures that this looks more green in artificial light and more blue in natural (sun) light. I also stamped some butterflies after one day but didn't like them too much so I didn't do any photos. I really need to work on my stamping skills. Placing small designs on the nail is much harder than it seems! 

Illamasqua Strike indoors, artificial light
I would really like to thank the amazing polish fairy that made it possible for this polish to reach me! I think this is such a classic and a must have for every turquoise lover out there! 


The red adventure part two: Rapsodi 326

Hello again! Second post for today featuring another red. This time with a happy ending! 

A week ago I was browsing some shops in the city just to see if there was any new stuff in. I saw this new brand that was very very cheap (less than 1$ per bottle) and then it hit me. I should look for a blue-toned red since the price was right for me to experiment and there were a lot of red shades to choose from. I chose one that looked ok in the light of the shop (although you can never know with these). I was very pleased with the outcome! 

Rapsodi 326 in the sun

This red is so yummy! I'm not a red wearer myself but I crave one from time to time. This is the perfect blue-toned red crelly. It has the opacity of a creme with the amazing shine of a jelly. The sun pictures are all without top coat and look at that shine! I just love how this looks on me! 


There is a drawback of this polish however, namely the durability. It shows tip wear after one day of wear and it needs top coat badly to make it last longer. I don't mind because it's not a color I wear often and the price is right. It's almost as getting it for free. 

Rapsodi 326, indoors, artificial light
I'm pretty happy with this red and I'm sure I won't need another one in my collection anytime soon. It's nice to know that if I want to have red on my nails, I have the perfect shade in my collection. 


The red adventure part one: Sleek Geisha's Seal

Hello my beauties! Another beautiful spring day is a good opportunity for me to show you some reds. I have two posts in store for you. But first I want to apologize again for not commenting on blogs and not replying to your comments. I'm really behind, again and I have to catch up. It gets old, I know, but what can I do. 

The first red that I will show you today is one by Sleek MakeUp. I've had this polish since December and I've used it as underwear for my China Glaze Ring in the Red mani that I posted about here. When I first bought it I expected it to be more blue-toned, but I was disappointed to see it's not. It actually pulls very orange on me. 

Sleek Geisha's Seal, indoors, artificial light
This picture makes it look even more orange than in reality, but it still looks awful on me. I hate how my hands look when I have such a polish on. I wore this immediately after I nubbinized my nails, so you imagined how bummed I was about my nubs with such a color on. I really don't know what I was thinking. 


The formula on this is a little thick. I remember I had trouble applying it the first time so I added a few drops of Seche Restore. It's very opaque but it looked patchy after one coat so I did two. Drying time is average, I guess. Here's a picture of it in direct light that is a little more accurate. 


I'm sure this doesn't look this orange on somebody else, but on my cool skin tone it just turns horrible. So to make it better I tried a little stamping using my m60 plate and China Glaze Liquid Leather. I did like how it turned out and I wore this combo for around 2 days. Not bad considering the color. 


I think I'm gonna give this away because I really don't see myself wearing it again. I'm ok with this brand just not with the color. Maybe I will try others in the future. 


OPI Don't mess with OPI

Hello lovelies! It's a beautiful day over in my corner of the world, and I sure hope it's the same where you are! Today was the first day I went outside to take pictures in full sun. No more freezing in the window when there's a sunny but cold day. No more trying to catch some rays trough the window. Yay! 

Today is also the first post where I'm showing you my nubs. I still have some pictures with long nails to post and this is by no means in chronological order, but I wanted to get some green up on the blog since it's St. Patrick's Day. This is not a holiday we have in my country. It seemed a lot of fun to do something themed for it though, so I did some nail art which I will be showing you later. Until then, this is my base color. 

OPI Don't Mess with OPI in the sun (yay!) 
DMWO comes from last year's Texas collection and is the most perfect shade of medium green creme. It's not too dark, not too bright, just perfect! I got this over a year ago and have only worn it once until today. I was actually lemming for China Glaze Starboard and found this auction on ebay for the OPI. They are not the same but definitely close so I went for it. I ended up paying about 6$ for this, which is great for OPI in Europe. 


I have no idea why I kept postponing wearing this again. Application is a breeze and it's opaque in two coats. This was my first OPI and my first encounter with the ProWide brush. I remember that the polish went everywhere when I applied it. I'm happy to say that I've improved a lot and only had to do minor cleaning today. 


All pictures are without top coat. It dries to a very glossy finish. This is the perfect St. Patrick's Day polish! Stay tuned for some nail art! 


Revlon Whimsical

Hello my dears! How excited are you about the weekend? I don't know how it is where you live, but spring finally kicked in today over here! I can officially retire my winter coat because I was dying with it on today. Yay! This is my favorite time of the year! I also have something really amazing to show you in this post. Drum roll please!

Revlon Whimsical over China Glaze Kinetic Candy, indoors, artificial light
How lucky was I to be able to get this! I believe it is only available in the US. But with the help of an amazing polish fairy, it landed on my doorstep. I was wearing this manicure exactly a week ago, the day I broke my precious nails. So this makes me even more nostalgic. Because it's sheer, this is a definite layering polish. I used China Glaze Kinetic Candy as a base. Look at those two! They were made for each other!   

they are actually closer in reality but they photographed a bit differently
My hand is not big enough to hold these two properly. The base color in Whimsical is very similar to Kinetic Candy. So I did 2 coats of the China Glaze and then two coats of Whimsical over it. I was in a hurry and didn't take pictures of Kinetic Candy by itself, but I promise I will the next time I use it. It's such a gorgeous pastel blue!


Revlon Whimsical is made out of large blue and pink hex glitter and small blue glitter suspended in a sheer blue milky base. The glitter pieces can look darker but that's mainly because of the way they are suspended in the polish layers and the way light hits them. This is said to be a dupe of Deborah Lippmann's Glitter in the Air. I don't have that one but according to the comparisons online they are pretty close. 


Application is not very easy on this one. The glitter pieces come off from the brush when you wipe it on the bottle. If you don't wipe it properly you will get a lot of the milky base on the nail and that's not good either. It's totally worth it though because this is so dreamy and gorgeous! I've used one coat of China Glaze Fast Forward but it might have used two for it to be totally shiny. I can't wait to layer this over different polishes and see how it looks! 


Avon Violetta Sparkle

Hello loves! How's your week going so far? I'm still torn about my short nails and waiting for spring to kick in. Today's post features my beautiful long nails again. I'm very behind with my posts and I think I wore this about two weeks ago (I don't post chronologically anyway). 

Avon Violetta Sparkle, indoors, artificial light
I've been eyeing some Avon polishes for a while now and I was curious to try them. The one I was mainly lemming was Sequined Turquoise. So I ordered it along with Violetta Sparkle but ended up wearing the second one first. The other one has a more summery feel to it and is still in my untrieds. I can't tell you which collection this is from because I'm very confused about how Avon handles these. All I can tell you is that this is from the Nailwear pro line and is still available over here. 


Violetta Sparkle is a purple jelly with golden flecks in it. The flecks look a little different depending on the light and on the number of coats you use. For me, this was very similar to Orly Fowl Play in terms of color and the way it looks in poor lighting. Of course they are different when you look closely. This has golden flecks while the other one had different colored flakies. 


It went on pretty smooth but needed 3 coats for full opacity. The problem with this polish was shrinkage. I used it with China Glaze Fast Forward top coat and painted it on a few hours before bed. That's when I took the photos. I woke up to see that my tips were completely naked. I walked around for two days like that although I wasn't pleased at all. I'm not sure if it reacted like this because of the top coat or this is something regular with this polish. I will try to use it again with another top coat and see. 


I really have mixed feelings about this polish. I do love the color and the finish, but I think that for this price the quality is not the best. I got these on sale but they are usually more expensive than local brands. I'm not very impressed with the quality of Avon products in general. I will form an opinion after I try the other polish as well. 


Gabrini M106 and 339

Hello my beauties! Another Monday, another week. Sadly I'm starting this week with really bad nails. I broke one on Friday so I had to reduce them to total nubs. Of course I hate them like this and the nail that broke is so thin that today it broke again, even if there was only like half a millimeter over the nail bed. But no worries cause I still have a lot of pictures to last me for the next posts, until my nails grow at least a bit. Today's post is about a newly discovered brand. I saw these in a small store about a week ago and the colors were so fun that I couldn't help but come back the next day and pick up a couple. I was not sorry at all! 

Gabrini is a brand that comes from Turkey. From the smell I can tell they are not 3free. But although they probably contain toluene, the smell is only present when you paint them on. After they dry they don't smell anymore. I have polishes from ELF (who claim their polishes are 3free) with a really strong smell that is still present hours after application. The toluene in the Gabrini polishes also makes for an easy application. They dry really really fast and they have a nice, squishy finish. I would say that these are somewhere between creme and jelly (crelly if you will). Let's see the swatches. They are both without top coat.

Gabrini M106, indoors, artificial light
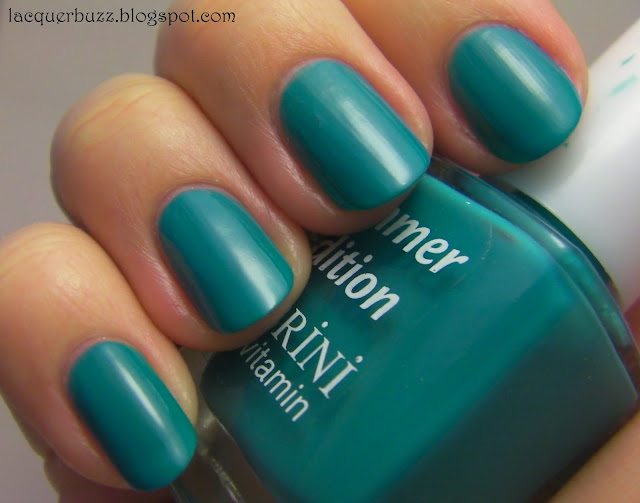
M106 comes from he Summer Edition collection. It's a turquoise crelly that is very hard to photograph. The first picture shows it in my light box. It came off much more blue than in reality. The next picture, although not very good, shows the true color better. 

Gabrini M106 in the sun
This is a little sheer but is still pretty opaque in two coats. I didn't add a third one because I knew I was going to do something over it (I used it as a base for this mani). There was a bit of VNL in some lights though. Be careful with this because it stains. Use a top coat! I didn't and had to clean my nails with toothpaste afterwards. 

Gabrini 339 in the sun
339 is from the regular line and is a teal-green crelly. This is more opaque and only needs 2 coats for a full mani. Again, I had to use the sun pictures because they showed the color better. I used it as a base for this stamping mani

Gabrini 339 in the sun
I was really impressed with these polishes. The colors might not be that original but I was happy to find out I had no dupes. 339 seems like a lighter version of Essie School of Hard Rocks, while the closest polish I have to M106 is China Glaze Flyin' High (and they're not even that close). Of course for the price (around 1.5$) they don't wear very well. They show tip wear pretty early, although they don't chip easily. I would say these are great for a quick and fun mani that you don't plan to wear for many days.  

Easter Nail Art Tutorial - Cadbury's Mini Eggs!

This design was suggested to me by my best friend Sara - as soon as she said it, I knew it had to be done, if only as an expansion on the Cadbury's Chocolate Manicure! I worked tirelessly on a tutorial for it so you can all do it yourselves at home :D I know it's a bit early for Easter Manicures, but it's that time of year where Mini Eggs hit the shops an I love them! I don't know if you can get them in the US, but FIND THEM. THEY ARE LIKE EASTER-TIME CRACK.

This will also be part review for Boots 17 new nail polishes which I picked up last week. I chose 3 of them - Mellow Yellow, Glisten and Juicy. They're really fresh, bright spring/summer colours so I really couldn't resist. First up is Mellow Yellow, a gorgeous mid-tone yellow with gold micro-shimmer. It's beaaautiful.


The application of Mellow Yellow was lovely, this is two coats and there is no visible nail line (VNL). It's glossy and dries relatively quickly. From experience, 17 polishes go thick and unusable rather quickly so invest in a polish thinner like Seche Restore if you want to keep this bad boy for more than a few months.

The perfect yellow for a mini eggs packet, I hear you say? Yes, it is. Tutorial time!

1. Start with your yellow base and take a chocolate-brown polish like Barry M Mushroom. Draw large ovals in a sporadic pattern across the nail. This is the outline of the eggs!

                        
2. Take a selection of pastel coloured polishes. I chose American Apparel Office (green), Collection 2000 Candyfloss (pink), Natural Collection White and Collection 2000 Angel Wings (purple/grey). Paint over your brown ovals with the pastel shades, but leave a small brown outline.


3. Time to add some brown speckles to the eggs! Take a dotting tool (or a toothpick if you don't have one!) and take a small bead of your brown polish on the end. dab this gently onto your pastel eggs.


4. Take a purple polish or purple Nail Art Pen. This step is much easier to do when you have the control of a Nail Art Pen, but if you have a steady hand then go for it with a small brush. Write the words "Mini Eggs" in the Cadbury's font on your thumb. This is optional, you could always just draw more Mini Eggs!


5. Add a topcoat to protect your design from wear and tear and to make it super glossy. I used Seche Vite.


6. Stand back and admire your Cadbury's Mini Egg Easter Nail Art!


I added Claire's Matte Topcoat over the top to achieve that powdery look and feel that mini eggs have.


There you are! Cadbury's Mini Egg nails, perfect for Easter! If you've given up chocolate for lent then a) I don't know how you live b) You can enjoy chocolate in an alternative way!

As always, if you follow my tutorial I would love to see it so pleeease let me know!

I hope you have fabulous weekends!


Easy Angry Birds nails using water decals - review and tutorial

Hello loves! It's Friday! Yay! Since it's technically the weekend, I'm gonna show you something really fun today. I received these water decals from KKCenterhk to review for you guys. I chose these Angry Birds ones because I love that game and I think they are so cute! Here's my final manicure. 


How fun are these? It was the first time I used water decals so it was totally new for me. I had no experience whatsoever and they were so easy to use. I do like these because there's no stickiness involved. As long as they are wet you can move them around as much as you like and they are very thin. After you put on top coat they level out perfectly. 


They come as a sheet that has 24 water decals. What I didn't like is the lack of instructions. They should include some instructions for people like me that don't know how to use them. That's why I decided to do a little tutorial for you guys, including some of the tips and tricks I've learned while applying these. 

Step 1: Paint your base color on the nails and let it dry. I used Gabrini M106 (swatches coming soon) as a base and then sponged OPI No Room for the Blues near the cuticles to mimic the sky. Finally I sponged little lilac clouds using China Glaze Light as Air. I was trying to mimic the background in the Valentine's Day levels of the game (since some of the decals have little hearts on them). I then added a coat of top coat to level it all out and let it dry for a few minutes. Sadly I forgot to take a picture of the background without the decals but you get the idea.


Step 2: Choose the decals you want to use and cut them up. 


Step 3: Put your decals in the water. You can put a few at a time because they have to be there for 20-30 seconds. The best way to remove them from the paper is by sliding them off. Don't try to peel them because they are really thin and they will bend easily, making it hard for them to get straightened again. The moment they slide right off the paper is the moment you can remove them from the water. 


Step 4: Slide off the decal from the paper and put it on the nail. Now, there are several ways to do this. You can use tweezers (as shown in the picture). This might look very professional but I found it harder than using your actual fingers. If you don't want to do it "like a sir", use your fingers and just place the decal on the nail. It might seem messy but it gives you better control. The decal sticks to your finger so you can't drop it like you can with tweezers. 

Step 5: After placing the decals in the desired positions on the nails, use a coat of top coat to cover them. This is mandatory because these will come off otherwise. The top coat also gives beautiful shine to the nails. Another tip would be waiting a bit before applying the top coat. The decals need to dry so they become a bit adherent to the nail. If they are still very wet they will slide right off when you run the polish brush over them. 


And that's it! You then have amazing colorful images on your nails. This is especially great for people who are not very good at nail art. It's also a very quick way to spruce up a manicure. These will last you as long as you manicure lasts. There's no way they can come off once covered with top coat. I tried to take a picture that included my thumb but I'm terrible at the "claw" pose. I immediately get a cramp when I do that. Here's the best one I got. 


The decals can be purchased from KKCenterhk and ship internationally. There are hundreds of different designs to choose from. They've also sent a coupon code for my lovely readers. Enter "lacquerbuzz" in the coupon code box and you will get 10% off your entire order. 


*Disclaimer: Product sent for review consideration. For more info see my official disclosure policy.
Related Posts Plugin for WordPress, Blogger...