Showing posts with label Spectraflair. Show all posts

Spectraflair top coat vs Spectrafrankens

First up, this post has lots of pictures, but that's a good thing, right? 

The aim of today's post is to show you polishes in their natural state, then with a spectraflair top coat added, then compared to a similar spectrafranken, where the spectraflair is mixed in with the colour to create a new polish.

A few months back I saw some swatches of Spectraflair top coats and they never really impressed me.  I don't know if it's because they had too much spectraflair in them, but to me they seemed to hide the base colour too much.  Even if it was a really rich strong colour, it was dulled out with silver so that it looked pastel.  So one thing I was really conscious of was not adding too much spectraflair to my top coat. 

Because of that, I had never bothered with a spectraflair top coat and had always made full spectrafrankens where I mixed the spectraflair with the polish colour to create a full new polish.  I will save my verdict on Spectraflair top coats until the end of the post, in the mean time, you make up your own mind.

For my top coat, I mixed three tiny straw scoops about the size of a grain of rice, in a 5 ml bottle and filled it to about 3/4 full with Seche Vite top coat.  I figured I may as well use a decent top coat, as it was only going to be used as a top coat after all.

For the first comparison I started with Kleancolor Metallic Purple.  This is one coat in the sun, no top coat.


Same polish, in the shade (freaking awesome on it's own isn't it!)


Back in the sun, with one coat of my Spectraflair top coat applied to the index and ring fingers. One coat of regular SV top coat applied to the middle and pinky.


Same polishes, different angle.


Same again, in the shade.  Here you can see the silver speckles over the index and ring fingers.  I was very happy how this looked, because the colour barely dulled at all (it appeared my top coat was mixed at about the right saturation).


Then I removed the Metallic purple from my middle and pinky finger and applied the franken polish that I had created, using Metallic Purple, which I called "Not so original".   Clearly my franken had lots more clear in it, and it was never going to reach the same deep purple colour as the original Metallic purple.


Same as above, but in the shade.


And again, at a different angle.


Next it tried it with Kleancolor Metallic Aqua.  Here is Metallic Aqua on its own.


On it's own in the shade (again, another freaking amazing polish from Kleancolor).


With my Spectraflair top coat applied to the index and ring finger.


Then I removed Metallic Aqua from my index and pinky and applied Aquamum, my spectrafranken, to those fingers.


Different angle.
 

And another angle.


Same, but this time in the shade.  You really can't tell the difference between the Aquamum and the ones using the top coat.


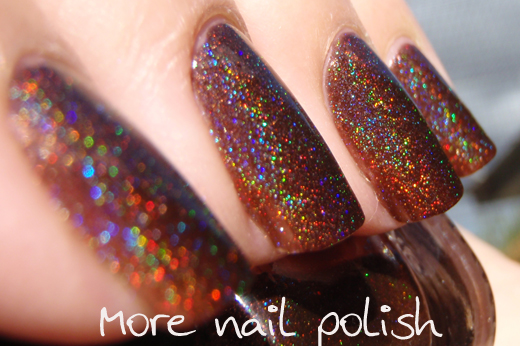
Final test over red.  This is Ulta3 Fire Truck.


Spectraflair top coat applied to index and ring fingers.


Same shown in the shade.


Removed Fire Truck from Index and ring fingers and applied Houzii's Armour.  Houzii's Armour, is based off Fire Truck, but it also has other colours in it too.  It is actually more of a pinky red and has a metallic sheen too.

Up close of Houzii's Armour on the left and Fire Truck with Spectraflair top coat on the right.


So there you have it.  Three totally different polish comparisons showing Spectraflair top coats and full spectrafranken polishes.

Over the purple, I loved it, but I think I preferred the holo effect in my franken.  I'm not sure if it's because the colours of the top coat got lost in the dark purple or what.  

Over the aqua, the Spectraflair top coat was great, I think I preferred just the top coat over the polish than my spectrafranken.

Over the red, the Spectraflair top coat was great in the sun, but looked a little silvery and washed out in the shade. But, it's so hard to get a red, red holo, that maybe the holo top coat is the way to go?

So my verdict. Spectraflair top coats are the bomb!  

Seriously, if you have spectraflair you have to make one.  BUT don't add too much, cause you don't want to end up with something that is so silver it makes every polish a pastel.  You can always do a second coat of top coat, but if you've added too much all you can do is split it into two bottles and dilute!

Spectrafranken - Purple Haven

Another spectrafranken today, cause I have so much fun creating them I just can't stop myself.

As soon as I created this polish I instantly knew who it reminded me of.  Kristy from the Polish Haven. You see Kristy has an addition problem with purple polishes, so I have named this franken after her blog. Purple Haven.  

When I went to create this franken, I was looking through all my Ulta3 swatches looking for something dark, but with a jelly finish.  I spotted Gooseberry, which is a very dark purply plum, the clear polish and the spectraflair really lightened it up and created this soft dusty purple.  I really love it.


This was make using:
  • 2/3 bottle of Ulta3 Gooseberry
  • 1/3 clear polish
  • 3 incy wincy straw spoonfuls (each the size of a grain of rice) of Spectraflair coarse grade
Don't forget to get creative and email me your spectrafrankens and/or colour morphing frankens, and go in the drawn to win three Picture Polishes.

Show me your frankens and win Picture Polish!

Ok peoples. I want to do a future blog post that shares your franken polish creations that use either the colour morphing powders or spectraflair.

You see, today's spectrafranken was inspired by Cute-tickle Nails blog post about a wanting to create a deep chocolate brown holo.  Her franken inspired this franken, and I want you all to be able to see what others are creating and get inspired with your pigments.

My future blog post will have photos and links to your blogs and photos of franken polishes created using colour morphing powders or coarse grade spectraflair. I hope it to serve as a portal through to all your amazing polishes from one location. AND if you send me your link/photo then I will put you into a draw to win any three Picture Polish shades of your choice - and let me tell you there are some awesome PP shades to choose from!

So, if you have a blog, you just need to email me a link to your blog post about one of your frankens (which use either a colour morphing powder or coarse grade spectraflair).  You also need to give me permission to post one of your photos on my blog together with a link.

If you don't have a blog, you just need to email me a photo of something you have created, swatched (preferably on your nail, but a wheel pic is ok too) and allow me to post that photo on my blog.

Easy right.  My email is morenailpolish@iinet.net.au and I'll give you two weeks to create something and send it to me.  You can send me links after that date of course and I'm happy to update my post, but I will randomly draw a winner for the three Picture Polish shades on 14 October 2011.

So now onto my franken polish inspired by Cute-tickle Nails franken polish.  This is my 'frosted chocolate cake'.  It's a deep chocolate brown, with a golden shimmer and pretty rainbow holo.


The recipe for this (in a small 5ml bottle) was:
  • 2/3 a bottle of Ulta3 Chocolate Cake 
  • 1/3 a bottle of Clear polish
  • 2 small straw spoonfuls (about the size of a grain of barley) of TKB Copper Sparkes
  • 3 incy wincy straw spoonfuls ( each the size of a grain of rice) of Spectraflair coarse grade
The TKB Copper Sparkes turned the creme Chocolate Cake polish into a shimmer, which I really should have swatched before I added the spectraflair, cause it was so pretty.

Anyway, get frankening ladies, and lets inspire each other!!

White holo franken

Ok, I'm not sure if this is a fail or not.  I mean I wore this on it's own for a day and liked it, and I fancied it up to wear it for a second day.  So it certainly isn't a fail in that regard.  But when I imagine a white holo in my head, it doesn't look like this.

Firstly, let me tell you about my first two white holo franken fails.

The first I created using half a bottle of Ulta3 lily white, and half a bottle of clear.  I then added the standard three little scoops of spectraflair.  What resulted was a horrible zombie dead looking grey.  

The second attempt used a whole bottle of clear with some white pigment (titanium oxide).  Again I added three scoops of spectraflair, again I got the zombie grey.

Given my success with the Kleancolour Metallics, I thought I would try metallic white to create this franken.  However, metallic white is actually a clear polish with white glass flecks.  So it actually didn't have enough pigment to pull it off.  Anyway, here are the pics.


This bottle pic shows the holo quite nicely.


Macro and on the right angle, you can see the holo.


It's barely holo, but it's still nice.  I don't have GG Light as a feather to compare it to, but I reckon they would be nothing alike.  I was holding off buying Light as a feather cause I was sure I could franken a white holo, but I think I'm going to buy it now.

Recipe, using a 5ml bottle (so multiple for a bigger bottle)
  • 15 drops of Kleancolor Metallic White
  • 6 drops of Ulta3 Lily White
  • fill the remainder of the bottle with clear.
  • 1 incy wincy straw spoonfuls of Spectraflair coarse grade
Because I wanted to avoid the the dead zombie grey nails, I really reduced the amount of spectraflair I added to this one.  It's nice, but not very holoie.  Also, it is sooooo sheer.  These pics were four coats, and VNL is still there.

Finally, like I said at the beginning.  I fancied this up using China Glaze gold crackle polish.  When I first did this I didn't really like it.  It reminded me of dry cracked skin.  The sort you get on your legs at the end of winter when you haven't moisturised for months cause your legs never show.  But during the day it really grew on me and in the end I loved it.  I actually also managed to match my outfit by wearing a striped beige and white cardi.  I totally didn't mean to match the outfit, it just happened.  I love it when that happens!

That's about all the spectrafliar frankens I have created at the moment.  I really want to wait until I get some suspension base before I make any more.  I want to do some colour morphing frankens too, but I've realized I pretty much sold everything I had, and have less than 1/4 of a gram of each colour left.  Looks like I will have to wait until the next shipment too.

Mediterranean blue - Spectraflair franken

It's been a crazy busy week for me with starting back at full time work.  But I was still determined to get a blog post in every day.  It's late, I'm tired, hubby has already hit the sack, and I want to toodle off to bed in just a jiffy.

Quickly here is my Mediterranean blue holo franken.  It reminds me a lot of Glitter Gal Marine Blue, in fact it's almost dupy.


Recipe, in a mini 5ml bottle
  • 10 drops of Kleancolor Metallic Sapphire
  • fill the remainder of the bottle with clear.
  • 3 incy wincy straw spoonfuls of Spectraflair coarse grade
 I will show you my white holo tomorrow.  Franken fail or Franken fantasic?  You'll have to wait and see.

OMG, Gosh it's a 509-61 holo - Spectraflair franken

Here is the straight silver holo I frankened.  I wanted to see if I could create a two coater, solid linear silver holo, and see how it compared to Gosh holo, Nfu Oh 61, Ozotic 509 and CG OMG.  

I'm officially calling it 'Moonstone', because on the swatch stick it looks really similar to CG OMG, and when I first swatched OMG, my mum kept saying "Oh, I love that one, it has a real moonstone look". 

I'm certainly not going to all this a franken fail, cause it's still really nice and I know a lot of people would kill to have a silver holo like this. But I'm not too sure if this really shows off the Spectraflair to the best of it ability.  Why? Cause I did what I say not to, that is, I added lots of spectraflair.  Maybe two or three times more than I should.  Certainly way more than what JDSU advised with the 1% loading.


I also wanted to try out using a french nude as part of the base to see how it would stay in suspension. Anyway, pictures first.


Recipe. This time in an empty Ulta3 bottle which is 13.5ml
  • half a bottle of clear polish
  • half a bottle of my sheerish french nude shade - really old no brand label on it.
  • 8 rather heaped straw spoonfuls of Spectraflair coarse grade
I'm not sure if using the french polish as a base also contributed to making this less holoy, or whether it's just because I used too much spectraflair.  Compared to my tan/beige coloured holo this looks rather drab. 

But using half a bottle of french nude certainly made it stay in suspension really well.  I don't have to shake this bottle at all.   Maybe I should have used the french nude as the base for the coloured polishes, rather than the silver?

I tell you, it's really hard not to want to add more spectraflair.  I was thinking "just a little bit more and it might be more holoie", "just a little more"... "Doh, too much".  And of course you can't take it out once it's in.  I also didn't swatch on finger as I was going, which I always do now.   When I get some real suspension base, I'm going to try another silver holo, and I wont be putting as much spectraflair in.

Aquamum - Spectraflair franken

Here is my teal franken, which I'm actually calling aqua now, cause it really isn't teal at all (and it was much easier to come up with a corny name for it using 'aqua' rather than 'teal').  Sorry Kejal, I'm way off on the colour with this one. 

But even though I'm way off the proposed 'teal' colour, I pretty much managed to dupe Ozotic 515. 

So here is my Aquamum franken, or for you US ladies Aquamom.


Below is a quick swatch I have thrown in of Ozotic 515.  See how the colours are almost identical.  The holo effect in my franken looks a little less holoie than the Ozotic, but for ladies who live outside Australia, maybe a franken like this might just curb your lemming for the too hard and expensive to get Ozotics.


Ok, back to my franken pics now.


Recipe, using a 5ml bottle (so multiple for a bigger bottle)
  • 8 drops of Kleancolor Metallic Aqua
  • fill the remainder of the bottle with clear.
  • 3 incy wincy straw spoonfuls of Spectraflair coarse grade
Now, just a quick word about the colour morphing powders and spectraflair stuff.

I wanted to thank so many of you sweet ladies. I’ve read some really lovely comments on various forums/boards and in the many hundreds of emails I have received in the last month or two.  So many of you have recognised the huge amount of work it has taken for me to take on this whole colour morphing and spectraflair business.

But there are always haters, those who think I’m trying to rip people off and make a squillion dollars in the process.  There have been some telling me they can source Spectraflair and on-sell it at a cheaper price.  Others that have jumped on the colour morphing powder bandwagon and will now be selling it too.  You know what? I don’t care. Knock yourself out! Do you really think I’m in it for the money?

I know I’ve done a good job.  I have provided people with a quality product, packaged in a convenient and usable way.  I kept postage as cheap as I could.  I processed orders as quick as possible (especially given the length of time it took for me to receive the products).  I’ve aimed to keep everyone informed and updated.  

In calculating my costs, I’ve had to factor in powder/spectraflair costs, shipping costs to Australia, plastic containers and stationary (paper, envelopes, tape and mini zip lock bags).  So I can sell spectraflair at $15/gram, I made a bulk purchase (costing thousands of dollars) using my own money, which will only be recouped once I sell at least 85% of it.

I’ve spent hours manually completing customs declarations to post 90% of my orders internationally.  Many, many more hours manually measuring and weighing each individual container to ensure you get what you’ve paid for.  In total I have packaged more than 650 individual containers with either colour morphing powder or spectraflair.  It’s taken a lot of work, but 99% of you appreciate that, which makes it all worth it.

So again, thank you all the lovely people who’ve recognised my efforts.  MWAH to you!  And a big fat up yours to the haters.
Related Posts Plugin for WordPress, Blogger...