Showing posts with label Glitter. Show all posts

Karine, Romance à Paris/ Swatches and Review

There are lots of Indie polishes that are just awesome!  I'm seeing lots of fabulous glitter combinations.  I have one to show you today by Karine.  Romance à Paris is a fuchsia jelly with multicolored flakies and glitter.  What polish lover do you know who doesn't like jellies, glitter and flakies? Lol!


I was so surprised the first coat was opaque and the glitter/flakies evened out nicely. I used 2 coats


The only thing I didn't like about it, it dried a bit dull.  


After I applied Seche Vite topcoat I fell in love.  Look at the glitter and flakies shine.


Don't have to worry about  Romance  à Paris being hungry for topcoat.  Very smooth with only one coat.


Karine did a fabulous job putting this blend together.  Keep in mind it's not 3 free. 

Romance à Paris is part of a 10 polish collection called The Birthday Club. These will be available on April 1, 2012.  For more information, visit Karine's Facebook page HERE and follow Karine's blog HERE.

This was sent for review


Pin It

Until next time please have a great nail polish day. (✿◠‿◠) Share/Bookmark

Blue Alley Deals

For today I've got a glitter gradient gradating from a magenta glitter up toward a royal blue. I pulled out two somewhat dusty, unused colors from my Helmer to get this manicure. They both live in the same drawer, which is a hodgepodge of Essie, OPI, Wet n' Wild and a few other mismatches that don't have enough family members to buy their own Helmer drawer. Don't feel sorry for this drawer though, it's quite a party in there. The Kleancolor Chunky Holos and the entire Wet n' Wild Color Icon collection live in there. Solids and neutrals beware, this drawer's trouble!


I love the combination of these two royal, jewel toned colors paired together that comes across even more stunning in real life. Back Alley Deals and Saved by the Blue both come from Wet n' Wild. Saved by the Blue is one of those polishes that's always on the shelf, but you'll be lucky to find anymore Back Alley Deals. That collection was a limited time assortment of glitters only available at Walgreen's, and of course, only for a limited time. It's cruel how companies insist on creating the best polishes for only a limited time, and leave their less inspiring shades out year round.

St. Patrick's Day mani

Hello again! This is my second post today and I'm very excited. I just love the green overload in my Google Reader. That's because I love green! Here's my modest nail art for the occasion. 


First of all I would like to say that I haven't done freehand in a while. I've really lost my mojo and need to start doing more. This nail art is very simple and I think anyone can do it. The base color is OPI Don't Mess with OPI (here's my previous blog post with the swatches). I usually do the same thing on all my nails but this time I went for sort of a skittle look. 


My ring finger and my thumb have one coat of ELF Golden Goddess. I've previously shown this and stated that it has a terrible smell (definitely not 3free as they claim) and the larger hex glitter lays on the bottom and is impossible to get out. I even turned the bottle upside down before I used it but I still could only get one or two pieces of larger glitter on each finger. 

here's a lousy shot that shows my thumb (excuse the shadow and the weird angle) 
I used Golden Rose Nail Art 108 (the only gold I have) and some dotting tools for the four leaf clovers. On my middle finger (the leprechaun belt) I used a black striper and a nail art brush with the same gold. I really like how this came out. My left (dominant) hand only has the glitter accent fingers and still looks great. 


As I've stated before, I love green and I particularly enjoy this OPI green. I just hope to see it more in the landscape, now that the snow has melted. Happy St. Patty's Day to you all!


Modern Leprechaun

Without even thinking about what tomorrow is, I made today's manicure St. Patrick's Day appropriate! I'd been thinking about the combination of these two polishes for a while, originally hoping to make a reverse gradient using the colors. When I finally got around to painting my nails last night though, I realized how much thinner Set the Stage (Sally Hansen) was in its glitter formula. It wouldn't have worked nearly as well as Crown Me Already did for my mermaid nails. (I think that post is actually my most popular.)

I didn't feel much like creating a huge, gloppy blob of glitter near the base of my nails, trying to reach the correct consistency, so I decided to paint the whole nail with the gold. It's done over Essie's Sew Psyched. I have a teeny weeny little sample bottle of that, and it's just about the cutest size I've ever owned. Unfortunately, after about 2 manicures with it, it's half empty. In the literal way, not the pessimistic way.

When I was putting the polish away, I noticed Glitter in my Stocking in the same drawer, and kind of kicked myself for not using that for the gold gradient. It has more reds than I'd like to go with the green of Sew Psyched, but it still may have been pretty cool. Next time!

Revlon Whimsical

Hello my dears! How excited are you about the weekend? I don't know how it is where you live, but spring finally kicked in today over here! I can officially retire my winter coat because I was dying with it on today. Yay! This is my favorite time of the year! I also have something really amazing to show you in this post. Drum roll please!

Revlon Whimsical over China Glaze Kinetic Candy, indoors, artificial light
How lucky was I to be able to get this! I believe it is only available in the US. But with the help of an amazing polish fairy, it landed on my doorstep. I was wearing this manicure exactly a week ago, the day I broke my precious nails. So this makes me even more nostalgic. Because it's sheer, this is a definite layering polish. I used China Glaze Kinetic Candy as a base. Look at those two! They were made for each other!   

they are actually closer in reality but they photographed a bit differently
My hand is not big enough to hold these two properly. The base color in Whimsical is very similar to Kinetic Candy. So I did 2 coats of the China Glaze and then two coats of Whimsical over it. I was in a hurry and didn't take pictures of Kinetic Candy by itself, but I promise I will the next time I use it. It's such a gorgeous pastel blue!


Revlon Whimsical is made out of large blue and pink hex glitter and small blue glitter suspended in a sheer blue milky base. The glitter pieces can look darker but that's mainly because of the way they are suspended in the polish layers and the way light hits them. This is said to be a dupe of Deborah Lippmann's Glitter in the Air. I don't have that one but according to the comparisons online they are pretty close. 


Application is not very easy on this one. The glitter pieces come off from the brush when you wipe it on the bottle. If you don't wipe it properly you will get a lot of the milky base on the nail and that's not good either. It's totally worth it though because this is so dreamy and gorgeous! I've used one coat of China Glaze Fast Forward but it might have used two for it to be totally shiny. I can't wait to layer this over different polishes and see how it looks! 


Outlined Flowers

I was originally inspired for today's manicure by Gully Nails's post, Polka Dot Flowers. After looking at her design again, I know I kind of missed the mark, but I'm still sort of giddy about my own design. Sort of seems kind of Spongebob-esque.


The base color here is Secret Peri-Wink-Le (China Glaze), overlaid with Whimsical (Revlon).  The petals are a combination of Feeling Great (Sinful Colors) and Lightening (Sally Hansen Insta-Dri). Finally, I drew the inner pollen spots with Time Off (Sinful Colors).

I will try this again to get it closer to Becky's design, because I absolutely love it.

Black and White Glitters

I may not be posting my nails, but I am most certainly not going to abandon you guys.

I have some awesome news and exciting tips for you today.

One of the most coveted nail polishes available to lacquer heads today comes from Lynderella: Connect the Dots. It's a gorgeous polish that goes well over every single thing it's layered with. Check out some of these examples:


Unfortunately, this beauty of a polish is really hard to come by, and may be harder now that she has closed shop for a while and made her blog private. Sucks I know.

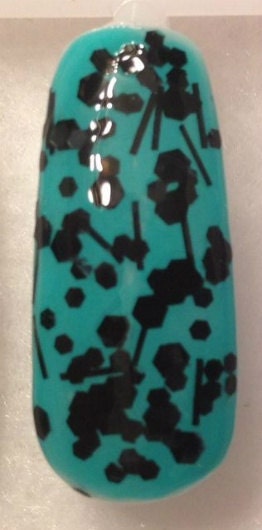
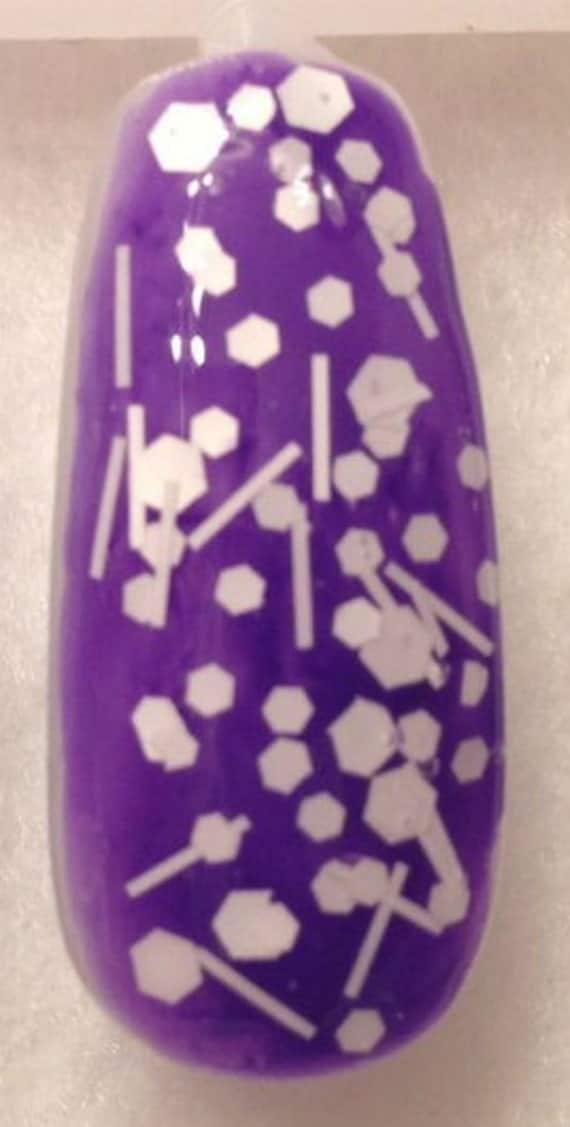
Luckily, there are opportunities out there to get dupes and polishes that are really close. I just ordered two of these from All That Glitters, an Etsy shop run by Kirsten. She has two glitter polishes that are similar to Connect the Dots. For the black, she has Spotty Dottie Dark.


For the white, she has Spotty Dottie Light.


I just ordered one of each, so I have no idea how the consistency and application is, but those beautiful solid glitters make me so happy.

There has also been another move on Connect the Dots from Ninja Polish. They sell polish from a polish creator called Cover Band Lacquers. Their almost perfect dupe is called Sticks n' Stones and is currently sold out. You'll notice though that there is a message to buyers near the bottom that reads:

Sticks 'n Stones is not a limited edition product. The creator is working furiously to make us more stock. We expect a lot of stock again within 2-4 weeks.

The Spotty Dottie's go for $8.00, and Sticks n' Stones goes for $9.00. While Lynn is clearly unhappy about theses polishes popping up, you'll be happy to know that you have access to similar polishes.   

Gilded Leaves

Recently, I won my first giveaway by luck of the draw over at grape fizz nails. The prize was the coveted Whimsical (Revlon) and another beauty, Violetta Sparkle (Avon). That package arrived today from Canada, so I decided to use my prize for tonight's manicure.


I had an impossible time trying to get a good picture of the combination I came up with, so these pictures aren't the best. You get the general idea though.

The plate used is BM-11, which is quickly becoming my favorite plate to stamp with. (I used it a while back during my mini self-challenge and again for Secret Agent Lila.) The polish to stamp with is Passion (China Glaze). They're more fun in person. I couldn't quite get the shine from Seche Vite to show up properly.

Thank you again Anne for the lovely giveaway, and the great prizes!

Claire's Holographic Glitter and Bundle Monster Stamping Art!

Hello lovelies, my blog has a new outift - how do you like the new layout and banner?! It's a work in progress so forgive any glitches you might come across!

I nipped in to Claire's Accessories the other day (as any self-respecting, 21 year old does on her lunch break...) and noticed a couple of polishes I hadn't seen before - the shop girl informed me that they were, in fact, new out and I had the last one of their (usually impossible to get hold of) lilac holographic glitter. Since I want anything 100x as much if I know I can't have it, I thought I better buy it to save myself later heartache. It did not disappoint, it is a gorgeous holographic lilac glitter and opaque in 3 coats:

please ignore the stub...

Ahhhhh rainbow!

As if that weren't interesting enough, I thought I'd stamp the cute heartey-liney image from Bundle Monster BM11 (imaginative adjectives don't come easy, late at night) using Konad Black Special Polish.


This looks great when it catches the sunlight and the stamping makes a glittery manicure a bit more fun and interesting! I added a coat of Seche Vite to finish and the glitter is totally smooth - not gritty at all. I'm not looking forward to the removal though, it will be the foil method, for sure. (I will do a tutorial for this!)

Thanks everyone! I have recently joined Pinterest so I can share all my favourite nail designs and inspiration on a virtual pinboard - if you're on Pinterest, it is really easy to pin anything you see on Emily's Nail Files - just sign up and get a "pin it" button on your toolbar! Alternatively, look for the Pinterest button on my pages :D


Follow Me on Pinterest

love!


Silver glitter tips

Hello my lovelies! It's Saturday and many of you will go out tonight. For a night out you need a bit of glitter. This is actually a mani I wore a few days ago when we went out to celebrate the end of exams. I usually don't like french manicures, but I think the glitter makes it totally different. I chose to do the tips over a clear pinkish base, but this can also be done over a colored base. 


To do this manicure I've used the loose glitter from my previous ebay haul. I love this glitter because it's so so sparkly. Another advantage is that it's easier to remove than regular glitter polish. But if you are afraid of glitter getting everywhere, you should not try this. It's very fine and very hard to manage and I ended up using the vacuum cleaner to remove it from my worktable. The good thing however is that soap and water usually make the excess glitter from your hands disappear.


I was afraid that the yellowness of my nails would show trough, but the pinkish base concealed it pretty well. I actually find this manicure very delicate and a great way to wear glitter without it being over the top. 


Next time I do this I will use a colored base however because french manicures are just not me. I did enjoy wearing this very much, though! 


Orly Fowl Play

Hello my lovelies! Today is finally my first day of vacation! I haven't had a proper vacation in such a long time and I had to study even during the winter vacation. I'm so happy that I finally have a week and a half all to myself! 

Today I want to show you what I wore on Valentine's day. Now this is not a holiday we celebrate in our country. It got here recently following media influence. I really don't care about reds and pinks or girly stuff, so I wasn't inspired to do nail art for this occasion. I just painted this on because I wanted to paint my nails and it was a lovely choice. 

Orly Fowl Play, indoors, artificial light
This polish is a festival of flakies! It is honesly one of the most beautiful things I've seen in a long time. Here's a bottle shot. 


The base color of this one is purple. It looks much more purple with two coats, but I did 3 coats because the result was richer and more opaque. This way it looks darker, but you can still see the purple and it doesn't look black. The flakies are mostly orange/copper and blue, but they shine different colors depending on the light. There's also small silver glitter in the mix. It's really hard to describe. So you should just see for yourself. 


Sadly, I had to remove this last night because of my exam. I had no time to make it matte like I do with all polishes. But I will make it matte one day and I'm sure it's gonna be glorious! 


Darker Valentine

Valentine's Day is tomorrow, and today will probably be the last of my mini series of Valentine's Day manicures. Andy and I have plans to make some homemade ravioli (with spinach, ricotta, and Italian sausage inside) which probably won't leave much time for my hands to be painted. Toxic nail polish in delicious homemade food doesn't sound too appetizing.


Today I used Sally Hansen Insta-Dri Cinna-Snap as the base. Holy cow is that color sexy. It's such a deep, dark, almost bronzed red. Definitely a one-coater, and a hell of a job to clean up in the cuticle area. I then layered on some Chunky Holo Scarlet. Topping it all off is Synergy from L.A. Girl's Glitter Addict collection. I had plans to do some stamping, but I'm really pleased with all these glittering combinations lately.

A Happy, Provocative, Uninhibited Good Time

My title is describing a rave.

Have you ever been to a rave? It's full of bright colors, bright lights and bright music. Sure, you're surrounded by a lot of people who are probably on drugs, whether that be ecstacy, alcohol or some sort of psychadelic, but honestly, if you like the music, none of that matters. I've been to lots of raves, mostly when I lived in California, and I always had fun. If you hate electronic dance music, you would hate them, unless of course you went for the drugs, in which case you would love them...and everyone that goes to them. Either way, they're a pretty fun experience, and I'm glad I got the chance to go to some amazing ones.

One of the best I've ever been to was the Electric Daisy Carnival in Los Angeles. It has since been moved to Las Vegas due to safety issues at the Colosseum, but it was amazing the two years I went. It was by far the brightest rave I've ever been to, and rightly so, being in the middle of summer and selling some of the highest number of music tickets in history. To honor the awesome times I had there with some awesome people, and to honor the names of the polishes used for this manicure, here's Happy Go Lucky (China Glaze), Uninhibited, and Provocative (L.A. Girl).


Looking back, I should've stopped with Provocative on top of Happy Go Lucky, but it just didn't look like enough at the time, so Uninhibited joined. It's certainly not bad, but maybe too busy now. That's raves for ya though!

Holo Glitter & Flakie Extraordinaire!

Last night I had only one piece of this manicure in mind...the flakies. I collected all five of the Finger Paints Effects polishes, and hadn't used them yet. I could've put them over black, but who hasn't seen that? (If you haven't, you need to look at blogs more.) So, inspired by my good friend Jen who I got to see today, I chose purple. Originally, all I wanted to add to the purple (Grape Pop, China Glaze) was one of the flakies, Twisted. As I was pulling Twisted out of the drawer, I grabbed Asylum instead, and thought that too belonged on the purple. One thing led to another, and after an hour of polishing, I created this agglomeration of glitter, holographics and sweeping joy. 


Heh...overboard? I just couldn't stop myself! So the final tally for polish usage came out to be five (not including my base and top coats). The holographic stripe is Hologram Glitter by Color Madric, and the black is Bad Chick from Sinful Colors. Both are striping polishes with the itty bitty skinny brushes. I can't get enough of those and dotting tools lately. My poor stamps are feeling a little neglected I'm sure. Don't worry guys, I'll get back to you.

Looks like Caramel

Good Morning,

I have an unusual color on today.  Most of you will think it's the most ugly color in the world.  I'm fond of all colors and I particular like these types of colors.  Looks like caramel to me.  Makes me think of a retro candy I use to eat while growing up.  Squirrel Nut Zippers...Yumo!  Nfu Oh JS39 is a jelly.  Only complaint I have once on the nail at 3 coats it's not bottle color.  I also slathered on a coat of Lynnderella Change.


Here bottle of Nfu Oh JS39  is a little darker 


See not bottle color


So what ya think about caramel colors?  Nay or Yay? 


Pin It

Until next time please have a great nail polish day. (✿◠‿◠) Share/Bookmark
Related Posts Plugin for WordPress, Blogger...