Showing posts with label BundleMonster. Show all posts

Claire's Holographic Glitter and Bundle Monster Stamping Art!

Hello lovelies, my blog has a new outift - how do you like the new layout and banner?! It's a work in progress so forgive any glitches you might come across!

I nipped in to Claire's Accessories the other day (as any self-respecting, 21 year old does on her lunch break...) and noticed a couple of polishes I hadn't seen before - the shop girl informed me that they were, in fact, new out and I had the last one of their (usually impossible to get hold of) lilac holographic glitter. Since I want anything 100x as much if I know I can't have it, I thought I better buy it to save myself later heartache. It did not disappoint, it is a gorgeous holographic lilac glitter and opaque in 3 coats:

please ignore the stub...

Ahhhhh rainbow!

As if that weren't interesting enough, I thought I'd stamp the cute heartey-liney image from Bundle Monster BM11 (imaginative adjectives don't come easy, late at night) using Konad Black Special Polish.


This looks great when it catches the sunlight and the stamping makes a glittery manicure a bit more fun and interesting! I added a coat of Seche Vite to finish and the glitter is totally smooth - not gritty at all. I'm not looking forward to the removal though, it will be the foil method, for sure. (I will do a tutorial for this!)

Thanks everyone! I have recently joined Pinterest so I can share all my favourite nail designs and inspiration on a virtual pinboard - if you're on Pinterest, it is really easy to pin anything you see on Emily's Nail Files - just sign up and get a "pin it" button on your toolbar! Alternatively, look for the Pinterest button on my pages :D


Follow Me on Pinterest

love!


Valentine's Day Nail Art!

Eeeeeevening!

This is a kind of improvised manicure - I wanted to do a "love letter" style design, with a cream and pink heart background and newspaper print over the top. Unfortunately, I couldn't get the STUUUPOIIDIDIDD newspaper to transfer with vodka, so I've ordered some surgical spirit to try instead! I was very frustrated. Bundlemonster to the rescue, I decided to use plate BM09 and stamp the "love" image repeatedly, so it looks almost like a love letter (or weird love graffiti).

I started out with a base of 3 coats of Bloom Nicole and then stamped the swirly heart image from Bundle Monster BM02 using Konad Special White Polish mixed with bright pink. I then used Rimmel Urban Princess to stamp three little love-hearts from BM03 in the gaps.

After a coat of Seche Vite, I used Konad Black Special Polish to stamp the Love image from BM09 repeatedly over the whole nail. This was tricky to get straight! The beauty of adding a coat of topcoat before stamping, is that if you make a mistake you can take it off with nail varnish remover without destroying your previous stamping.


Don't forget you can click to enlarge!! A little bit different from my Anti-Valentines Day manicure...but I can get into the spirit of things!

I hope everyone had a lovely V-Day, single or not! Let me know what you think on the comments :D

xxx

Accessorize Nail Polishes - A/W and Metallic Collection Review

Greetings, all!

Today I have 2 Accessorize polishes under review - I remember when Accessorize first launched their cosmetic range and was SO pleasantly surprised when the quality turned out to be top notch. My Coral Crush Lipstick is still one of my favourite make-up items over 1 year after buying.

Accessorize have recently launched 19 new shades of Nail Polish, including a metallic range - woweee!

I decided to give you some Nail Art to perv over, rather than just do a standard, plain review - I'm just THAT kind to you! I started with a base of 2 coats of the Accessorize Winter Berry - a gorgeous warm-toned plum colour. It's the perfect wintery shade, in my opinion, and looks loooovely on the nails.

Now, if you follow the blog regularly, you'll know I don't really care for metallic finishes - they are not my fave - but they are PERFECT for stamping. This is especially the case for Accessorize Aquamarine, as it is a perfect one-coater and designed that way. I stamped the leafy image from Bundle Monster Image Plate BM210 and added a coat of Seche Vite to reveal the glitteryness.

used the flash so you can see the lovely glitteryness of Aquamarine!


Both polishes have a great consistency, with Winter Berry being especially glossy and easy to apply. They are brilliantly pigmented so these little babies will be great value for money. A definite YES in my book, I can see myself using Winter Berry constantly for a chic, winter look and Aquamarine for stamping. Excellenté.

You can snaffle yourself some Accessorize polishes from SuperDrug

Let me know what you think! Have you tried any of the new Accessorize polishes?

I think it's time that this guy made another appearance. Don't knock it, it is completely and utterly necessary.


xxx


These polishes were kindly provided by Accessorize for review. opinions are 100% honest and in no way influenced! :)

Winter Wonderland Nail Art!

I suppose I should've waited for it to snow before posting this manicure (the synchronicity would be satisfying!), but I still feel bad for leaving you all alone for a month so I'm cracking out all my best stuff.

Now, I really like the design of this manicure, but it was executed badly - this, I fully admit, is my own fault. I acquired the base colour (Barry M Aqua Blue) from The Clothes Show Live, and I didn't realise it was so sheer before I began applying it. Had I known, I would've used a pastel blue base because it took about 6 coats to achieve opacity. Too many! This, paired with the 4 coats of Claire's Holographic Silver Glitter Topcoat that I added to the tips, created that horrible "too many coats of polish" look. It's kind of bubbly and icky and raised off the nail - not a fan! As if it wasn't bad enough, my Seche Vite has gone thick, and caused shrinkage, exposing the very tip of my natural nail. Here are the photos anyway, just try and ignore the poor execution and focus on the pretty glitter and snowflakes! Eeee!


cuticles are GRIM, sorry sorry sorry!
How I created the glittery snowflake tips:

Once my Barry M Aqua Blue base was dry, I added a thin layer of Claire's Holographic Silver Glitter Topcoat, starting about halfway down the nail. On the second coat of glitter, I started my brush strokes slightly close to the nail tip, and repeated for another two coats to create the glitter gradient effect. Once dry I stamped the Snowflake image from Bundle Monster Image Plate BM14 at different places on each nail tip using Konad Special Polish in White. With Claire's White Nail Art Pen, I filled in some of the gaps with dots, to make tiny snowdrops. I topped everything off with 2 coats of Seche Vite, to make it super smooth.

Thanks everyone! Let me know what you think on the comments, I'd love to see it if any of you give it a go! I kept this on for a few days, I really liked it, especially when it caught the light!


xxx

Glossy Box Competition! I Need Your Help!

Hello Everyone!

I'm glad so many of you enjoyed my Star-Print Manicure from yesterday! Today's Nail Art is my entry into the Glossy Box Nail-Off - a Nail Art contest that they have launched in their facebook!

I'm not going to beg you for votes, as I truly believe that you should make your own mind up over who should win, but if you like the design and think that I deserve a shot, all you have to do is "like" my photo, located HERE! :)

I definitely would have done this design at some point anyway, I think it's really sweet. We were asked to create a design based on what we think Glossy Box is all about, and what it represents. I chose to do a mix and match manicure because, ultimately, Glossy Box is all about trying new things, and a little bit of everything - and a girl can never make up her mind! I chose the gorgeous turquoise, pink details to represent femininity and to celebrate everything fun and girly! I added the Glossy Box logo on the thumb to tie it all together - I think that was my tenth attempt at getting the logo right haha!


The Turquoise base is Nails Inc Haymarket, and the pink details are all with the Glossy Box polish Leighton Denny Babydoll - another little Glossy Box detail! I stamped the roses from BM14 with Models Own Pastel Pink, and added the leaves with a dotting tool in Barry M Spring Green and Claire's Jade Green. The base for the thumb is MUA Shade 2. The little lace design on the index finger is stamped using Konad White Special Polish, from Konad Image Plate M57. I added a coat of Seche Vite and my contest nails were ready to go!

Let me know what you think everyone! I think this is my absolute favourite mix and match manicure that I've ever done, the roses and bow came out perfectly, just how I imagined them! I was sad to take this off!

Again, I would really, really appreciate your vote in the competition, you can even vote for as many entries as you like, so I wouldn't have to be your only vote! There is some fabulous Nail Art on there, so I implore you to check it out! You can give my little, girly Manicure a "like" HERE. :)

(You may have to enable a Facebook app, but don't worry Glossy Box will never post anything onto your wall without your permission, it's simply a bit of red-tape for Facebook! :D )

Thank you so much to anyone that decides to give me a thumbs up, I really appreciate it and it just reminds me that my little blog would be nothing without all of you amazing readers who are so lovely to me every day :) (GOSH I'm gushing now haha!) But seriously, I love you all long time!

xxxxxxxxxxxxxxxxxxxxxxxxxxxxxxxxxxxxxxxxxxxxxxxxxxxxxxxxxxxxx

Star Print French Manicure

Hello everyone, I hope you all had a great weekend :)

Here are the nails I was sporting at the Motel and Glossy Box Event (see last post!). It's a "Funky French" Mani, aside from the accent nail, and is inspired by the black and white star-print which is creeping into fashion lately. I started with a base of 3 coats of Miss Sporty French Pink and then taped my nails with Scotch Tape (once the were completely dry) so that just the tips were showing. I then painted over the nail with MUA Shade 2, an opaque black, and lifted the tape off while it was still wet so as to attain neat, crisp lines. Once this, too, was completely dry I re-taped the tips and stamped the Star image from BM14, horizontally across the nail, with Konad White Special Polish. I then went back with single, stamped stars to fill in any big gaps and make the print more complete. Once dry, I added a coat of Seche Vite. For the accent nail, I simply stamped the star image numerous times to create an all over nail design :)

Photography is getting really, really difficult now the days are so much shorter, it has been dark practically all the time, and sunlight is extremely rare! Forgive the darkness of my photos!


Voila! A relatively short post (I'd forgotten how quickly you can write a post when it isn't 11293943 words long!), but it's a pretty simple design that's easy to re-create at home! Even if you don't have the Bundle Monster Image Plates, you could still freehand in the white starts with a Nail Art Pen or even a toothpick :D

Let me know what you think, everyone! xxx

Cath Kidston Nails


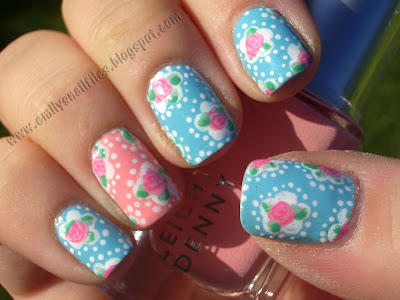
I wouldn't describe myself as a girly-girl, but I really like Cath Kidston Prints! I would never paper the walls with it, but I love it on accessories. It will always remind me of my friend Alice as well, because she is obsessed! I'm not sure how internationally well-known Cath Kidston is, but she's a pretty well established High End brand over here in the UK. A British Fashion Designer, Cath Kidston is famous for her signature, nostalgic floral patterns and home furnishings. I decided to incorporate my favourite print of hers into a manicure:


Here is the original print I based the design on, and I think it's as intricate as I can get it, seen as nails are SO SMALL.


For the accent nail I switched up the base colour from blue to Leighton Denny Babydoll - my new favourite Pink from the October Glossy Box.

I created the design by painting a base of either Bootie Babe Blue Baboo (see below) or Leighton Denny  Babydoll, and painted the large white flower shapes and polka dots with Claire's White Nail Art Pen. I then added a blob of MUA pink in the centre of each one. Now, I reckon I'm quite well known for my freehand work, and although I seem to be able to do an alright job on Dinosaurs or Super Mario (like in my previous posts), I have never been able to get the hang of drawing roses - I just have no idea why! Because of this I enlisted a bit of help with this design from Bundlemonster Image plate BM04, stamping the rose image on top of the MUA Pink circle using American Apparel Coney Island. After transferring the image to the stamp, I dipped a cotton swab in varnish remover and cleaned off the edge of the image, leaving only the heart of the rose, because I needed the design to be so small. After I had stamped all of these, I added some green foliage with a dotting tool and American Apparel Office and Barry M Spring Green. After a coat of Seche Vite, I was good to go!

I'm popping in a review here too, as I've been waiting on these polishes for AGES from brand new polish company Bootie Babe. Their polishes are packaged in novelty "booty" bottles that look like little bums! It's a bit gimicky, but it's fun and I think that is important with cosmetics! I was sent Blue Baboo and noticed that it was the perfect shade of sky blue for my Cath Kidston idea. The polish formula is O.K...it drags a bit and is a little paint-like, but definitely workable. Now, as much as the bottle makes me laugh, and I think it's a fun idea, the handle is almost impossible to use. It is absolutely tiny, and tapered so it slips out of your fingers. I gave up after a couple of nails and used a different brush to apply it. All in all, I like the idea and the novelty, but the quality of the polish and the handle design could be improved. Here is Blue Baboo on its own, as well as some shots of the bottles!


See how small the bottle handle is compared to my fingers? Very fiddly. You get just over 9ml of polish in these bottles.

A lovely shade of blue and not quite like any other shade in my arsenal. I would definitely head over to their website and check them out, there's loads of other great shades to get hold of.

I hope you like this one guys! I realise I don't post as much as I used to, but I think the posts I put up these days have much more crammed in to them, and have A LOT more time spent on them! I have some great designs coming up for you all :D

In other news, the Winner of my Glossy Box contest from 2 weeks ago was Vicky at Manicured Maniac - Congratulations to her! She has been notified and her very own Glossy Box is on it's way to her! WOOP VICKKKYY!!!

Glossy Box are also hosting a Nail Art competition, and I urge you all to get involved to win the OPI Muppets Collection! Emily's Nail Files also has a mention as a place to go for inspiration! Well, you're already here so you're one step ahead of the game! I'd love to see some of you enter, I know you're all SO creative xxxx

Happy Halloween! Spooooky Nails

...I realise Halloween was two days ago now, but I hope you all had a good time! These were my spooky, themed nails for the occasion!


For the haunted house accent nail I started with a base of American Apparel African Violet, used a sponge to dab on Barry M Cobalt Blue over 3/4 of the nail, then sponged on Topshop Celestial onto the top 1/4 to create a gradient effect to act as a 'night sky'. I then freehanded in the pale, yellow moon with Rimmel Lemon Drop with Collection 2000 Angel Wings for detail. I freehanded in the 'hill' with Claire's Jade Green and a small brush before stamping the house image from BundleMonster image plate BM224 with Konad Black Special Polish. I added Barry M Mushroom brown paths and outlined the house with Claire's Silver Nail Art Pen. I stamped the bat image from BM213 and freehanded in the little ghosts with Claire's White Nail Art Pen. I smoothed it over with Seche Vite!
For the rest of the nails I started with a base of Natural Collection White, sponged on Rimmel Lemon Drop and Collection 2000 Angel Wings, sporadically, to make them look a bit old and crusty (yuummmm). I then stamped on the spiderweb and spider images from BM13 with Konad Black Special Polish before adding a coat of Seche Vite.

There is a lot of steps involved in this Manicure, but it didnt take too long!

I hope you all had a great halloween!

Leighton Denny Sweetheart Nail Art - Win Your Own GlossyBox !

 This month's Glossy Box is here! If you're unfamiliar with the concept of Glossy Box, once subscribed, you receive 5 (6 this month though, due to it being an anniversary special) high end, luxury samples, with one of them being a full size product. This is for £10 a month, plus shipping, and there are other similar companies out there like Boudoir Prive, Carmine and Birchbox in the USA. This month's box contained a Leighton Denny polish, and mine was a pink, cream one called Babydoll. I'm glad of this, as the other two options were pearlescent, and you know how much I love cream finishes! I'll let you know at the end how you can WIN AN OCTOBER BOX FOR YOURSELF!

*EDIT - COMPETITION NOW CLOSED!*

I'm not sure if there's a name for this type of manicure, so I'm giving it one - the Sweetheart V-gap. A variation on V-gap pioneer Sophy Robson's original design, I made this to look like a pink heart, and added some rhinestones because - well, blue, sparkly heats just make everything a little more fabulous, don't they? I started with a white base of Natural Collection White, then freehanded in the sweetheart shape with the (very pliable) Leighton Denny brush. I then added some BundleMonster Blue, Rhinestone Hearts, and a coat of Seche Vite:


This has become my favourite pastel pink, it's beautiful in two coats, high-gloss and a really rich shade of pastel pink/rose. Here's a comparison with a few other pastel pink shades that I own:

Remember, you can click to enlarge!

As you can see, Babydoll is slightly more red-toned and deeper than the others I won. It's lovely! Also, ten points to whoever can guess which of my nails is a falsie hahaha - damn these breakages!

This is what also arrived in this month's Glossy Box. They usually have a variety of different products and it's a lucky dip which ones you get, but this month all boxes are virtually the same as it's a celebratory box for their 6 month anniversary:


  • Dermalogica Age Smart Multi-vitamin Thermofoliant
  • Dermalogica Age Smart Multi-vitamin Power Recover Masque
  • Leighton Denny Expert Nails Colour and Care
  • Stila Smudge Stick Eyeliner in Moray 
  • 3 Robert Piguet perfume samples
  • Dermalogica Age Smart Lip renewal Complex
  • Dermalogica Beauty Bag

    All in all, it's a very good box for me. I don't feel put off by the anti-aging products because I don't 'need' them, as an intense moisturiser is always good in my books! The lip gel is very small, but absolutely lush, it smells really nice and I'll definitely be using this at night time, while the winter cold creeps in on us Brits. The Stila Eyeliner deserves a post of it's own as it is really lovely and I have a lot of positive things to say - so I'll do a makeup look with it next week! Yay! I tried the Face Mask today and it really is lovely. It is a cream and doesn't dry tight on the face, leaving it soft and smooth! I have yet to try the exfoliator, but I reckon it will be just as good.

    The only downside to this box is that I HATE perfume samples. I never, ever, like how they smell (even though I know it's just me being very scent-fussy). These parfums are really floral, and not up my street at all. You can't even re-use them as stocking fillers, because that would be naff - who wants tiny vials of flowery old lady perfume from Santa? Exactly. Not me. Nor from Glossy Box. I'm sure plenty of people out there would love them though.

    NOW WOULD YOU LIKE TO WIN THIS MONTH'S BOX?!?!

    YOU DO?!

    THEN IT'S YOUR LUCKY DAY! (If you live in the UK - I can't accept international entries this time, ladies, I'm so sorry!)

    *EDIT - COMPETITION NOW CLOSED!*
    Glossy Box have kindly provided me with an extra box, and being the wonderful, loving, giving person that I am, I'm giving it away to one UK-based winner! All you have to do IS:
    •  Make sure you live in the UK
    • Make sure you are a follower on GFC or Bloglovin'
    • Leave a comment below with your email address - feel free to write it in some sort of MI5 code so the spam-bots don't get it, just make sure I can understand e.g JaneDoe(at)gmail(dot com)
    I will leave the competition open for 1 week, ending on the 26th OF OCTOBER - That is next Wednesday! I will pick the winner via a random number generator. Good Luck Glossy Girls!

    *EDIT - COMPETITION NOW CLOSED!*
    xxxx


    Autumn Leaves

    It's getting to that time of year where I can't wait to crack out last years over-sized woolly jumpers, hats and scarves (as well as buy new ones!). Despite it being unseasonally warm in the UK last week, I have to admit that this summer baby is oh-so-keen to bury herself in winter clothes, drink mulled wine and go sledging. My nails reflect my mood and eagerness for the changing leaves:


    I started with a base of Nails Inc Jermyn Street, a purple toned brown, and then sponged Nails Inc Candy Orange, American Apparel Manilla (yellow) and Barry M Bright Red onto random areas of the nail, to create the autumn-coloured  mottled effect. I then added a coat of Gosh Rainbow, an iridescent flakie topcoat that adds a subtle flash of red and green, before stamping the leafy image from Bundlemonster image plate BM04 with Miss Sporty Electric Beige. This caught the light differently at different angles and looked really pretty!

    What do you think? What's your favourite part of Autumn?

    Not my favourite song from him, but it's pretty appropriate, and I can't stop listening to him at the moment, everything he does is stunning:


    Plus...I love a good ginger.

    xx


    They're Not Teardrops...They're FLOWERS NOW!!!!

    Many of you who follow my blog (and probably some who don't!) will know that the designs I showcase are a mixture of both freehand and "stamped" nail art, with the image plates I use for the latter coming from Bundlemonster (and the occasional Konad!). WELL. Bundlemonster don't just do image plates, no Sir, they kindly sent me an array of other Nail Art bits and bobs that I wasn't even aware they produced! These included little wheels of rhinestones of carious shapes and colours, sequins, little starts, little flowers, and even teeny tiny coloured balls.
    Many of the rhinestones are in a teardrop shape, and they came in such pretty colours that I really wanted to use them. Call me Little Miss Sunshine, but I didn't fancy using them as teardrops, and so decided to utilize their shape and create little diamonté flowers! Each petal on the flower is a separate Bundlemonster, tear-drop rhinestone - and they're great, really easy to work with:-

    My short nails are really starting t bug me now, they just KEEP breaking! I don't want to have to resort to fakies!


    I started with a base of Barry M Spring Green, and added the leafy design using Konad Special Polish in Green, from Bundlemonster image plate BM19. After a couple of heavy lashings of Seche Vite, these babies stayed put for a couple of days!

    Overall, these little Nail Art additions are really good, and can add an entirely different dimension to a manicure, not to mention some bling! They're really not all that expensive from their website, about £10 for a set of 5 wheels, each containing 12 segments with a different accessory in it. They are also a fantastic company, who take customer satisfaction very seriously, always looking to improve their products on OUR suggestion.

    I hope you liked this design! Let me know :D

    Don't forget you can still vote for me in the Cosmopolitan Blog Awards! You can find me under Best New Beauty Blog of 2011! Click on the picture to cast a vote - it's quick and easy! :)


    *Product was provided by Bundlemonster, but all opinions and reviews are 100% honest, and completely my own. For more info, please visit my disclosure page!*

    Bundle Monster Roses Nail Art!

    Hi Everyone!

    So sorry I've been absent for the last 3 weeks, I was in America visiting the 8th Wonder of the World - Disney World. I thought I would have more time to blog, but after rollercoaster-ing all day, and unfortunate breakages as a result of acting the like the epitomal "big kid", I didn't quite happen! I am sporting short nails at the moment (they KEEP breaking!) but decided to use my Bundle Monster plates and have some double stamping fun - I kind of think this looks more like a wallpaper design, haha -


    The flash picture showed the subtle gold design better!
    I started with 3 coats of Bloom Nicole, which is a gorgeous sheer cream colour. I often use two coats of this on the tips if I want a classic french - it looks so natural and elegant. It really compliments a tan, too! I then used Bloom Goldie to stamp the vine image from BM21, and finished it off with a rose, from BM14, in the corner of each nail. I used Konad Special Polish in Red, and Black for the accent nail.

    I hope you like it - I'm loving being back! Haha!


    Related Posts Plugin for WordPress, Blogger...