Showing posts with label Barry M. Show all posts

Glittering Blue

I'd like you to meet Have An Ice Day, one of the stunning Million Styles Effect Top Coats from Catrice. This top coat has a clear base with tiny prismatic glitters. Ooh, sparklies! ♥ It looks a million times more awesome in real life, the sparkly effect is difficult to capture on a photograph. The bottle pic below came out pretty nice though. I'm wearing two coats of Have An Ice Day over Barry M - Cobalt Blue. The finish is slightly gritty, but a good layer of regular top coat will fix that. 
Thanks for watching! 

Boots 17 Juicy - Fruity Nail Art!

I have another of the Boots 17 spring polishes to show you today! It is a bright, lime green with micro-shimmer. I was tempted to do some floral nail art, but thought I would honour the name of the polish and do something Juicy!

This is 3 coats of Boots 17 Juicy - it goes on a bit sheer but the colour builds nicely and the shimmer looks lush, I don't usually like shimmer! I added some apples using Barry M red, Barry M Mushroom and Barry M Spring Green

You can click to enlarge the photos and see the shimmer!


I used a dotting tool to create the details and Claire's White Nail Art Pen to add the shine! I topped it off with a coat of Seche Vite.

What are you tinking to the 17 Spring Collection so far? Is this BRIGHT green something you would wear? Let me know what you think in the comments!

Don't forget you can follow me on twitter for instant updates on blog post and my silly, old life.

Pin this post to your pinterest board!! :D

Scaly Fingers - Barry M Croc Nail Effects

Sorry for leaving you all lonely for a week...

You'll all be thrilled to know, I'm sure, that I spent my weekend pretty much immersed in nail polish and therefore have lots and lots of new manicures to show you! I picked up Barry M's Croc Nail Effects the other day, but wasn't really expecting to like the results. I thought it would be too subtle and a poor alternative to the crackle effects - I was proved wrong, however, and I actually really like the effect it has given!

You apply the polish just like a crackle polish, with the thickness of the layer determining the type of crackle you get. the thinner the layer, the smaller the cracks, the thicker the layer the bigger the cracks (within reason - don't go plooping loads of it onto your nail, it will just get messy!) I started with a base of Barry M Gold Foil Effects, and found the Croc Effect worked better over a "touch dry" base, rather than a completely dry coat! I applied a medium coat and it took about 2 minutes to crack fully, leaving tiny vein-like cracks in the black polish - just like crocodile skin!


index finger - moments after Barry M Croc Nail Effects application
Barry M Croc Effects 2 minutes after application

This polish also dries shiny (as opposed to the matte crackles), so this is with no topcoat. i'm two days later and I have to say it has worn pretty well, considering it's just 2 thinnish layers of polish! Nice one Barry M! As I said, I wasn't really expecting to like this effect all that much and it is very subtle to the naked eye, but its really grown on me and I've ended up loving my scaly fingers! Mmmm scaaallyyyy.


A different kind of scaly, crocodile fingers

Thanks everyone, let me know what you think on the comments!

(Did I make up the word "plooping"? I'm pretty sure I did. I'm Captain Dictionary, over here.)


Indigo Lunar Eclipse

I love snow. But when it starts snowing at the moment I want to photograph my fresh new mani, I hate snow. I wish I had more pictures to show you, this looks so awesome! Recently I finally bought Barry M - Indigo, an insanely gorgeous blurple creme (the colour was hard to capture on camera, it looks much deeper and purplier irl). Indigo applied beautifully, two coats were enough for full opacity. I wanted to add something to it without losing too much of that beautiful colour so I lightly sponged the tips of my nails with Lunar Eclipse from Orly. This is a dreamy combination, I like it very much! Indigo is such a stunner, why haven't I bought it earlier? In my experience Barry M never disappoints!

Thanks for watching and enjoy your weekend!

Winter Wonderland Nail Art!

I suppose I should've waited for it to snow before posting this manicure (the synchronicity would be satisfying!), but I still feel bad for leaving you all alone for a month so I'm cracking out all my best stuff.

Now, I really like the design of this manicure, but it was executed badly - this, I fully admit, is my own fault. I acquired the base colour (Barry M Aqua Blue) from The Clothes Show Live, and I didn't realise it was so sheer before I began applying it. Had I known, I would've used a pastel blue base because it took about 6 coats to achieve opacity. Too many! This, paired with the 4 coats of Claire's Holographic Silver Glitter Topcoat that I added to the tips, created that horrible "too many coats of polish" look. It's kind of bubbly and icky and raised off the nail - not a fan! As if it wasn't bad enough, my Seche Vite has gone thick, and caused shrinkage, exposing the very tip of my natural nail. Here are the photos anyway, just try and ignore the poor execution and focus on the pretty glitter and snowflakes! Eeee!


cuticles are GRIM, sorry sorry sorry!
How I created the glittery snowflake tips:

Once my Barry M Aqua Blue base was dry, I added a thin layer of Claire's Holographic Silver Glitter Topcoat, starting about halfway down the nail. On the second coat of glitter, I started my brush strokes slightly close to the nail tip, and repeated for another two coats to create the glitter gradient effect. Once dry I stamped the Snowflake image from Bundle Monster Image Plate BM14 at different places on each nail tip using Konad Special Polish in White. With Claire's White Nail Art Pen, I filled in some of the gaps with dots, to make tiny snowdrops. I topped everything off with 2 coats of Seche Vite, to make it super smooth.

Thanks everyone! Let me know what you think on the comments, I'd love to see it if any of you give it a go! I kept this on for a few days, I really liked it, especially when it caught the light!


xxx

I'M BACK...

...did you miss me?! I have definitely missed my little corner of the internet and I feel absolutely AWFUL that I've neglected it :( I have started a new job and I work very long, miserable hours - not a lot of free time or daylight. Enough wining, I'm so happy to be back and really sorry for being away so long! Today's Nail Art is a super-intricate freehand manicure to make up for it! Admittedly it's Christmas themed, and I've kind of missed the boat on that, but here it is anyway :D

Santa through a dawn sky on Christmas Morning!


I started with a gradient base (American Apparel African Violet with Barry M Cobalt Blue and Topshop Celestial sponged over the top) and freehanded in the reindeer with a brush and Barry M Mushroom. I then drew in Santa Claus with various Nail Art Pens and added the snow on the rooftops and sky by dotting a White Nail Art Pen. I topped it off with a coat of Seche Vite and I was so pleased with how it came out!

I know it's not Christmas anymore, but I'm finding it hard to let the festivities go haha! Let me know what you think on the comments (and also how your lives have been, I feel so out of touch!)

xxx

Barry M Dusky Mauve

It's Saturday! How's your weekend going so far? Unfortunately, I have to study most of this weekend because exams are starting next week. The first one will be an easy one, but after that it's gonna be hell, so expect a lot of slacking off from my part on this blog. But until then there will be plenty of posts like the one from today that features the (in)famous Barry M Dusky Mauve. 

indoors, artificial light
If you haven't heard of this polish yet, let me tell you that it is famous for being a perfect dupe for Chanel Paradoxal. Now I don't own the Chanel to do a comparison, but I've seen pictures on other blogs that confirm this. This color is very hard to describe. It's a greyed out purple with a hidden shimmer. According to this guide, I would rate it as an iridiscent finish. I don't know how this is with the Chanel, but the shimmer is really hidden in this one. It's hardly visible in bright light and only in certain angles. I was very disappointed by this fact. Look at how gorgeous it looks in the bottle! 


But on the nail, not so much. I found myself looking at some plain mauve nails almost the whole time I wore it. For these pictures I used artificial light and no lightbox to capture at least an idea of the shimmer, but it was very hard. 

click on the pictures to enlarge
Application was great. I really love the formula and the brush of the Barry M polishes. Perfectly opaque in two easy coats and fast drying. I can't comment on the wear time because I only wore it for two days. 


I'm not sure I'm gonna wear this again. Don't get me wrong, I love Barry M polishes and would love (and will get) a lot more of them in the future. I just didn't feel it with this one. Maybe I will find somebody that enjoys it more than me (like my mom or something). What do YOU think? 


Happy Halloween! Spooooky Nails

...I realise Halloween was two days ago now, but I hope you all had a good time! These were my spooky, themed nails for the occasion!


For the haunted house accent nail I started with a base of American Apparel African Violet, used a sponge to dab on Barry M Cobalt Blue over 3/4 of the nail, then sponged on Topshop Celestial onto the top 1/4 to create a gradient effect to act as a 'night sky'. I then freehanded in the pale, yellow moon with Rimmel Lemon Drop with Collection 2000 Angel Wings for detail. I freehanded in the 'hill' with Claire's Jade Green and a small brush before stamping the house image from BundleMonster image plate BM224 with Konad Black Special Polish. I added Barry M Mushroom brown paths and outlined the house with Claire's Silver Nail Art Pen. I stamped the bat image from BM213 and freehanded in the little ghosts with Claire's White Nail Art Pen. I smoothed it over with Seche Vite!
For the rest of the nails I started with a base of Natural Collection White, sponged on Rimmel Lemon Drop and Collection 2000 Angel Wings, sporadically, to make them look a bit old and crusty (yuummmm). I then stamped on the spiderweb and spider images from BM13 with Konad Black Special Polish before adding a coat of Seche Vite.

There is a lot of steps involved in this Manicure, but it didnt take too long!

I hope you all had a great halloween!

Autumn Leaves

It's getting to that time of year where I can't wait to crack out last years over-sized woolly jumpers, hats and scarves (as well as buy new ones!). Despite it being unseasonally warm in the UK last week, I have to admit that this summer baby is oh-so-keen to bury herself in winter clothes, drink mulled wine and go sledging. My nails reflect my mood and eagerness for the changing leaves:


I started with a base of Nails Inc Jermyn Street, a purple toned brown, and then sponged Nails Inc Candy Orange, American Apparel Manilla (yellow) and Barry M Bright Red onto random areas of the nail, to create the autumn-coloured  mottled effect. I then added a coat of Gosh Rainbow, an iridescent flakie topcoat that adds a subtle flash of red and green, before stamping the leafy image from Bundlemonster image plate BM04 with Miss Sporty Electric Beige. This caught the light differently at different angles and looked really pretty!

What do you think? What's your favourite part of Autumn?

Not my favourite song from him, but it's pretty appropriate, and I can't stop listening to him at the moment, everything he does is stunning:


Plus...I love a good ginger.

xx


They're Not Teardrops...They're FLOWERS NOW!!!!

Many of you who follow my blog (and probably some who don't!) will know that the designs I showcase are a mixture of both freehand and "stamped" nail art, with the image plates I use for the latter coming from Bundlemonster (and the occasional Konad!). WELL. Bundlemonster don't just do image plates, no Sir, they kindly sent me an array of other Nail Art bits and bobs that I wasn't even aware they produced! These included little wheels of rhinestones of carious shapes and colours, sequins, little starts, little flowers, and even teeny tiny coloured balls.
Many of the rhinestones are in a teardrop shape, and they came in such pretty colours that I really wanted to use them. Call me Little Miss Sunshine, but I didn't fancy using them as teardrops, and so decided to utilize their shape and create little diamonté flowers! Each petal on the flower is a separate Bundlemonster, tear-drop rhinestone - and they're great, really easy to work with:-

My short nails are really starting t bug me now, they just KEEP breaking! I don't want to have to resort to fakies!


I started with a base of Barry M Spring Green, and added the leafy design using Konad Special Polish in Green, from Bundlemonster image plate BM19. After a couple of heavy lashings of Seche Vite, these babies stayed put for a couple of days!

Overall, these little Nail Art additions are really good, and can add an entirely different dimension to a manicure, not to mention some bling! They're really not all that expensive from their website, about £10 for a set of 5 wheels, each containing 12 segments with a different accessory in it. They are also a fantastic company, who take customer satisfaction very seriously, always looking to improve their products on OUR suggestion.

I hope you liked this design! Let me know :D

Don't forget you can still vote for me in the Cosmopolitan Blog Awards! You can find me under Best New Beauty Blog of 2011! Click on the picture to cast a vote - it's quick and easy! :)


*Product was provided by Bundlemonster, but all opinions and reviews are 100% honest, and completely my own. For more info, please visit my disclosure page!*

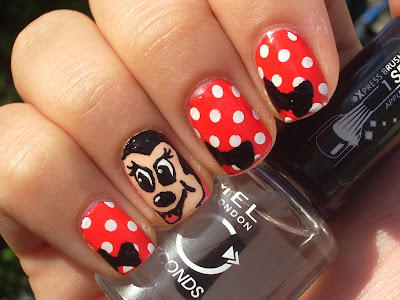
Minnie Mouse - Disney Nail Art

Hello Everyone!

Sorry for my absence, I've been on holiday in Majorca! Me and my family had a lovely time, it was great to unwind for a week and catch some sunshine, as well as stuff my face - something I am rather good at.

I popped on a new manicure as soon as I got back, and, inspired my excitement for m next holiday (a trip to Disney Land), I decided upon Minnie Mouse Nails!

I started with a base of Barry M Peach Melba (the Barry M Red polish I used really "pops" when it's applied over a light, neutral colour, it's a bit sheer and dull, otherwise), and then added two coats of Barry M Red. I used Konad White Special Polish and Image Plate M79 for the polka dots, and freehanded in some black bows using Claire's Black Nail Art Pen. For the Accent nail, I mixed American Apparel Palm Springs with a little Natural Collection White Polish and painted the whole nail. I then added the details using Claire's Nail Art Pen in Black and White. I topped it all off with Rimmel's 60 Second Topcoat!


So there we are! I'm sure I will be sporting this a lot when I'm over in America! Let me know what you think guys, I love Disney so I'm sure there'll be a lot more where this came from!

I also had some interesting blog traffic this week, and logged on to find a lot of referrals from www.bodycare.becomegorgeous.com, who have written and article on little old me, in relation to summer nail art trends. You can check it out HERE! :D
xxx

Rubik's Cube Cake + Nail Art

I want to show you guys another cake I made, an edible Rubik's Cube this time. I made this cake for my brother's birthday (in case you're wondering, I have three brothers, I'm the only girl :) ). This was the hardest cake I've made so far, it costed me blood, sweat and tears, but the end result made me forget all of that. I filled the cake with lemon curd and lemon cheesecake bavarois, it was scrumptiously delicious!

Needless to say, this cake inspired me to do some nail art: fun times! (If you want to see more cake inspired nail art posts you can click here). I used tape and free handed a bit. I started with the different coloured blocks (colour blocking to the max I say!), I waited for them to dry a little and added a layer of topcoat. Then I applied the black lines. After doing some touch-ups with acetone and a small nail art brush to create crisper lines I added another layer of topcoat. Doing one nail took me quite some time, luckily I'm a big fan of accent nails. ;) On the rest of my nails I applied Jade Is The New Black from OPI.
Thanks for watching!

The nail polishes I used:
jade green: OPI - Jade Is The New Black, blue: Barry M - Cobalt Blue, red: Zoya - Kristi, orange: Essence - Andy, You're A Star, yellow: Catrice - Don't Feed The Birds, white: La Femme Beauty - White, black: Essence - Fatal.

Bananarama

Facts about Bananas:
  • In 2001, Britain recorded 300 incidents of injuries related to bananas. The majority of these involved people slipping on banana peels.
  • In Eastern Africa you can buy banana beer. This beer is brewed from bananas.
  • A cluster of bananas is called a hand and consists of 10 to 20 bananas, which are known as fingers.  
These are MY banana fingers, a take on the, ever popular, Wah Nails Prada Banana Manicure:

I'm holding a banana, because there are bananas on my fingers - clever, I'm sure you will agree.


 Yep, my nails have had the chop. I had A LOT of unfortunate breakages, all at the same time, so didn't really have a choice! Thought about getting some Calgels on, but I have absolutely NO dollar at the moment! Full-Nail designs look great on both long ad short, so I'll be sporting them for a while! This is part of the reason for my unplanned absence, as well as trips to London, graduations, moving home and unpacking! 

I started with a base of Barry M Turquoise, my favourite blue evveeerrrrr - it's lovely and bright! I then made yellow crescent moon/banana shapes, using a fine brush, with Miss Sporty Taxi, and added a light yellow highlight using Rimmel's Lemon Drop. After outlining the whole thing using the striper in Claire's Black Nail Art Pen, I topped it off with a coat of Seche Vite

I realise it's not my best freehand work, pretty much if you can tell it's a banana, I'm happy! It didn't take very long at all, and is a really fun, summery look! I'm going to wear something different for my birthday, though, which is tomorrow! WOOPAH!

Hope you like it! Let me know which summer looks you've been wearing!

Barry M - Pink Flamingo + Konad M64

It's an amazing sunny and hot day, so this morning I decided I wanted summery nails! I'm wearing a beautiful nail polish from Barry M, Pink Flamingo. A coral leaning pink creme; bright, but also milky looking (does this make any sense? It's kinda hard to describe, lol). The formula was somewhat thick, but warm weather can affect the consistency of a nail polish, so it can be different on a colder day. I used three coats. For the stamping I used one of my favourite designs from imageplate M64 and Konad Special Nail Polish in White. As you can see I had some trouble placing the design the same way on all nails.. ah well. I love the colours together and from a distance it looks pretty neat. :O 

Thanks for watching! 

Colour Block Inspired Nails 2

A while ago I posted a colour block inspired mani and I loved it. I thought it would be fun to do a remake with different colours, so last night I threw all my creme nail polishes (a lot more than I thought! *whew*) on my bed to see what colour combinations would be cool and this is the result. As you can see I also practiced my taping skills. :) I like it. What about you?

The nail polishes I used:
dusty turquoise-green: Catrice - I Sea You!
smoky purply grey: Zoya - Caitlin
bright pink: Barry M - Shocking Pink
purply blue: Catrice - Pool Party At Night 

Thanks for watching!
Related Posts Plugin for WordPress, Blogger...