Showing posts with label Silver. Show all posts

Basketball and Nail Polish: 30 Day NBA Challenge Day 8 *TRAILBLAZERS*

Today's challenge: Portland Trailblazers
Team colors:White, Silver, Red, Black


Hi Guys,

Sorry again for another late posting.  I have been so busy but I finally had the time to do this manicure for you.  I'm happy the way this turned out.  I hope you don't get dizzy looking at the swirls. Lol! 

I used Stamping plate DRK-A I thought my swirl design was the closes I could get to the logo


Red: SinfulColors GoGo Girl the texture is like an inky red jelly if that makes sense


Black: SinfulColors Black on Black


White: SinfulColors Snow Me White used 2 coats


Silver:  Sally Hansen Insta-Dri Silver Sweep.  It's fantastic to use for stamping!

Before stamping I applied 2 coats of white, 1 coat for the red and black


History

The Portland Trail Blazers, commonly known as the Blazers, are an American professional basketball team based in Portland, Oregon. They play in the Northwest Division of the Western Conference in the National Basketball Association (NBA). The Trail Blazers originally played their home games in the Memorial Coliseum, before moving to the Rose Garden in 1995. The franchise entered the league in 1970 and has been based in Portland throughout its existence. The franchise has enjoyed a strong following; from 1977 through 1995, the team sold out 814 consecutive home games, the longest such streak in American major professional sports.[3] The Trail Blazers are the only sports team in the "Big Four" sports leagues located in the state of Oregon. After the Vancouver Grizzlies and the Seattle SuperSonics left and relocated to Memphis and Oklahoma City respectively, the Trail Blazers are also currently the only NBA team based in the binational Pacific Northwest.
source


*Other Bloggers taking the 30 Day Basketball Challenge
The Exotic Lacquer
Lovin Nailz

See Challenge Day 1 *Lakers* HERE
See Challenge Day 2 *Thunder* HERE
See Challenge Day 3 *Spurs* HERE
See Challenge Day 4 *Clippers* HERE
See Challenge Day 5 *Mavericks* HERE
See Challenge Day 6 *Rockets* HERE
See Challenge Day 7 *Grizzlies* HERE


Pin It


Until next time please have a great nail polish day. (✿◠‿◠) Share/Bookmark

Blue Monday, Milani Sail Away

Good Morning,

Milani new 2012 Spring Collection.  I just had to pickup a few.  Of course I grabbed both blues and a few more.  Today, I am wearing Sail Away a navy blue packed full of blue and silver shimmers.  It's so saturated that I only needed one coat!  I do have on a base coat and ridge filler.  Easy to apply.  Milani is wowing me with their one coaters! I haven't seen Chocolate Sprinkles yet...must find it *-*


Did you pick up any?  Which ones? 


Pin It

  Until next time please have a great nail polish day. (✿◠‿◠) Share/Bookmark

Winter Wonderland Nail Art!

I suppose I should've waited for it to snow before posting this manicure (the synchronicity would be satisfying!), but I still feel bad for leaving you all alone for a month so I'm cracking out all my best stuff.

Now, I really like the design of this manicure, but it was executed badly - this, I fully admit, is my own fault. I acquired the base colour (Barry M Aqua Blue) from The Clothes Show Live, and I didn't realise it was so sheer before I began applying it. Had I known, I would've used a pastel blue base because it took about 6 coats to achieve opacity. Too many! This, paired with the 4 coats of Claire's Holographic Silver Glitter Topcoat that I added to the tips, created that horrible "too many coats of polish" look. It's kind of bubbly and icky and raised off the nail - not a fan! As if it wasn't bad enough, my Seche Vite has gone thick, and caused shrinkage, exposing the very tip of my natural nail. Here are the photos anyway, just try and ignore the poor execution and focus on the pretty glitter and snowflakes! Eeee!


cuticles are GRIM, sorry sorry sorry!
How I created the glittery snowflake tips:

Once my Barry M Aqua Blue base was dry, I added a thin layer of Claire's Holographic Silver Glitter Topcoat, starting about halfway down the nail. On the second coat of glitter, I started my brush strokes slightly close to the nail tip, and repeated for another two coats to create the glitter gradient effect. Once dry I stamped the Snowflake image from Bundle Monster Image Plate BM14 at different places on each nail tip using Konad Special Polish in White. With Claire's White Nail Art Pen, I filled in some of the gaps with dots, to make tiny snowdrops. I topped everything off with 2 coats of Seche Vite, to make it super smooth.

Thanks everyone! Let me know what you think on the comments, I'd love to see it if any of you give it a go! I kept this on for a few days, I really liked it, especially when it caught the light!


xxx

Boots 17 Magnetized Polish

I'm not a fan of this metallic nail polish trend. I just don't like the finish of metallic polishes, it feels a bit childish and cheap to me - this  Boots 17 magnetized polish, however, is one aspect of this trend that I can fully get on board with, I LOVE IT. Maybe I'm just a sucker for novelty (I love my Del Sol colour changers for example), but I really love how the effect looks! It's like crazy robot fingers, they look so 3D! Like the recent crackle trend, this technique is maximum nail art effect, with minimum effort.

Magnetized polish works by formulating the lacquer with iron particles, and by holding a magnet with a pattern polarized into it over the nail, the iron particles become attracted to the patterned magnet, and the design appears in the polish. It's pretty innovative and scientific! Don't let anyone tell you the beauty industry is dumb haha!

17 are not the first company to bring these out, LCN, Fashionista and Essence both have a magnetized polish range, and in the UK, Nails Inc have bought some out too. Nails Inc magnetic polish retails for £13.00, however, and my 17 version cost me £4.99 and they literally look exactly the same. (I also bought the blue one, and 17 are giving away a free gift with 2 products bought - WINNER. Any way to justify my addiction).

Here is the finished look. Definitely took me a bit of practice, but I nailed it after a couple of tries! (Pun intended, haha):


The polish comes with the patterned magnet slotted on top of the polish handle, and it just lifts off:


This is what the polish looks like when un-magnetized (this is an option, don't forget! You can still just use it as a gunmetal, metallic polish! 2 for the price of 1!). It's a shimmery, gunmetal silver that is actually very pretty, and bang on trend. I took this photo with flash so you can see how sparkly it is, as well as how amazingly 3-dimensional the magnetized nails look:


The magnet has to be held over the polish while it's wet, and the best way to get the most pronounced effect, that I found, was to apply a thick layer and immediately place the magnet over the top as quickly as possible. The wetter the polish, the more defined the effect will be. The magnet has a little lip on one side, so you can rest it on your finger while you magnetize. It takes 5 seconds, maximum, to create the pattern :


And voila!:


I also bought the blue one, but I couldn't get it to work as well. I need to keep experimenting I think! I'm not sure these polishes are in every single boots, the advantage of living in Nottingham (where Boots originates from) is that they usually stock absolutely everything. You can, however, buy them online very easily. I really want to try out some different magnet patterns, I know LCN did a starburst one - now THAT would look awesome. Has anyone tried these magnetic polishes from 17? How do they compare to Nails Inc or Fashionista? I absolutely love them, and am so glad I bought 2 different colours!

On a side note, the voting for Cosmopolitan's Blog Awards is now closed, thank you to every single one of you who both nominated and voted for me, I really appreciate it! I'm up against some incredible, incredible blogs with thousands of subscribers, so don't get too excited haha. It is a great achievement for me just to be nominated, and never imagined this little blog would come so far. (This is starting to sound like an acceptance speech!) The reveal party is next week, cross your fiercely manicured fingers for me!


xxxxx

Rimmel: Rags To Riches

Good Morning,

Yay happy Friday! *-* I found the last one at Walgreen's Rimmel London Lasting Finish Pro Rags to Riches a metallic mossy green with silver shimmer it's a new shade for this fall.  It's really pretty.  No problems with the application.  I love the flat wide brush only needed two coats but I used three.  Seems like lots of olive-y greens are out for this fall.  Will you be collecting them?


I'm a bridesmaid in a friends wedding tomorrow.  I'll be wearing something silver on my nails.  Can't wait to show you ladies.  Have a great weekend! 

Until next time please have a great nail polish day. (✿◠‿◠) Share/Bookmark

Snakeskin...

...'cus I'm classy like that. This is deliciously White Trash, I feel like I should be wearing a matching pair of trousers and Crocodile handbag. Mmmmm.

I reckon I'm probably building up to some sort of crazy safari manicure, with the theme of animal prints emerging! I had wanted to try this image from the new BundleMonster set for a while, I was just trying to figure out the colour combos, which I'm not sure I've got spot on! I started with a coat of Barry M Mushroom (I'm not sure if this is because it's quite old now, but this is now a perfect one-coater, though I'm sure it's not always been!). I then sponged on Claire's Jade Green, down either side of each nail. I used Miss Sporty Electric Beige to stamp with:

I remembered after the pictures, that I had used Electric Beige instead of Catrice Be My Millionaire!


I added Claire's Matte Topcoat over the design, and I really prefer it! What do you think? I love the feel of mattified nails as well, they're all smooth and velvety, I keep rubbing them on my face - weird? Yes.


Wooo hoo, snakey fingers, I'm off to explore the Jungle (and by Jungle, I mean Pub).

In keeping with the wildlife theme, I entered the Tiger Nail Art into Swaafie Blog's Inspired competition, and voting is now open! If you love me, you can head over and give me a vote! My design is number 3, and you've got until the 8th! There are so many amazing designs, and you can vote for your favourite three, so GO MENTAL! I would really appreciate you taking a look :D:D

"Check out Swaafie's contest, it's GGRRRRRRREAT!"  (I'm a loser) click here to see the original post


I hope you're all having a wonderful Monday!

The girliest you will ever see me!

Don't worry, these are MY nails, not those of Katie Price or any of the cast of The Only Way is Essex. I would never call myself a girly-girl (she says with a blog centred entirely around nail polish art and makeup), preferring to do more colourful, eyecatching and badass designs. This manicure is, however, the most trashy-fabulous you will ever see my nails haha. All that's missing is a giant 3D acrylic bow.

I've got exams coming up (BOOOO), so wanted something on my nails that would tempt me away from removing it and doing something else, to maximise revision time. Anyone whose ever had a full glitter manicure on, will know what an utter ARSE they are to remove. I am hoping that the fear of removal will make me concentrate harder on revision, and resist using nail polish as a distraction!

I started with two coats of Catrice Be My Millionaire, a silver polish, then added 4 coats of Models Own Juicy Jules. Juicy Jules is AMAZING, it's a holographic glitter, and catches the light beautifully - perfect for sunny days. I could have got away with 3 coats, but I wanted maximum glitter coverage. I had a hard time photographing the sheer awesomeness of this glitter, and I'm sure that if I had got it perfect, your eyes would have exploded anyway. I resorted to using a lamp directly over the nails, and using the macro setting (as opposed to the SUPERmacro setting) on my camera to blur the image sliiiighttly so you can see more of the holographic-ness. *gets a bit pic heavy from this point onwards...*

Juicy Jules on its own:
blurred so you can see the holographic sparkle

a sharper picture that doesnt show the colours as much! also sorry for my STUPID index finger that broke, I know it looks ridiculous!

I added a coat of Seche Vite to smooth it out and create a base for Barry M's new pink crackle polish Pink Fizz. I find the best way to use the Barry M crackles is to apply them thickly, as they crack better, with larger spaces between the pink bits. I hate it when you use a crackle and it barely cracks, so you can only just make out the base colour (I'm looking at you Boots 17!).

I added another coat of Seche Vite to top off the whole thing, and because the Barry M Instant Nail Effects dry Matte.

under the lamp

under the lamp
natural light

I tried my best to capture it, but imagine all that holographic glitter shining through! BLINGTASTIC! Now, this was somewhat of an experiment, but I took a video on my camera to see if I can better show you the sparkle. The quality is pretty poor, but it does give you a good idea of the shine. (bloody nicked my cuticle right before though didn't I?!)


Hopefully you get an idea! I actually tweeted this manicure at Amy Childs from The Only Way is Essex (a trashy reality TV show over here in the UK - IT'S BRILLIANT), she is yet to reply though haha :P
Let me know what you think everyone, was it worth it to include a video? I really wasn't sure about it, but thought I would get some feedback from you :) I realise this isn't strictly Nail Art, but that's what I love about crackles, they add instant interest to a Manicure with minimal effort. I know they've been around a while now, but I've not seen this combo before :D

Em x

Stars, Skulls, Swirls, Sponging and Stamping. (Giveaway Winner, too)

God, I love it when an alliterative post title comes together.

The whole shabang for you today, I went a little stamp crazy...

All photos in natural light
Please ignore the smudge-tasic index finger! After all that work, there was no way I was re-doing it haha!

I'd been wanting to use the Skull image from the new Bundle Monster Image Plate set for a while, but was in danger of utilizing it to create some kind of gross emo-dream/Pirates of the Caribbean tribute! I decided, in the end, to keep the colours light, and add some swirly pattern and some stars :D

I started with a base of Barry M Turquoise, and sponged on Models Own Blooboo in differing places on the nail. I then repeated this with Silver, from Claire's Silver Nail Art Pen. Now, I've mentioned this before, but however wonderful this silver is (and it is), it gives you the WORST glitter herpes ever. You can scrub and scrub at your silver-stained cuticles but it Just. Won't. Go. Away. So, I apologise for the sparkly cuticles haha! I also added a little bit of Rimmel Sky High to the sponged base too :)

After adding a coat of Seche Vite to smooth it out, I stamped the swirly, planty image from BM225 using Konad White Special Polish onto different parts of each nail. Then, using THIS method, I mixed my own pastel Special Stamping Polishes and stamped some pink, green and purple Skulls from plate BM211. I then did the same with the Star image from BM206, adding them sporadically to make a pattern. I added some coloured rhinestones to the Skull eyes (a later addition - I liked it without, too) that you can get from Nail Art online store Born Pretty.


If people like this look, I may do a sponging/stamping tutorial, because it looks rather busy and difficult, but it's really very simple, when you know how!

Also, I'm going to quickly announce the Giveaway winner (I know it's been a long time coming, soorrryryyyy).
I have contacted her and she's accepted, the winner is...

Lily over at Beauty's Bad Habit!

Congratulations! I'll be posting your goodies after my exams (next week :D)

I used Random.org to select a random number, then simply found that numbered entry in my spreadsheet!

(Didn't want to include your email, Lily!)

So, there we are! My first Giveaway, over and done with! As you can see I had a colossal amount of entries, so they took a while to verify - thank you for your patience, and for entering in the first place!

I hope you enjoy your prize Lily, check out her blog Beauty's Bad Habit!

I also got some great feedback from the giveaway question "What would you like to see from me in the future", so I'll be sharing some of the suggestions with you soon! 

Thanks Everyone!

Diet Coke inspired

I was sat in the sunshine, guzzling a gallon of Diet Coke (more commonly referred to as Dissertation Fuel/Hangover Cure) and decided to transfer the pattern on the ASOS.com Competition bottles onto my naaaailllzzz. I could've incorporated some fun freehand in to this, but wanted to do something quick and easy.

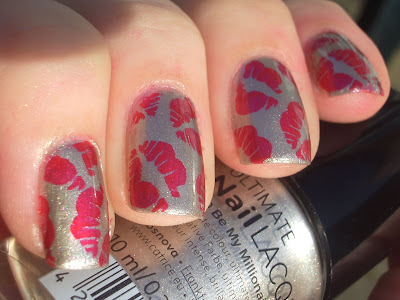
I started with a base of Catrice Be My Millionaire (acquired recently from a giveaway win over at colourful bottle - thanks Dolores!). This is a rather sheer silver, so I applied 4 coats. I then used Barry M Bright Red to stamp with. I chose not to use the Konad Special Polish in red, because I wanted some of the shininess of the Silver to show through! Here is the bottle I used for inspiration, and some sunny pictures of the Mani!


I tell you, I think my nails are becoming free advertising space! This was a fun, and it was nice to do something quick, bright and eye catching! 
News on the Bundle Monster contest is that I didn't win, unfortunately, but never mind! I was going to buy the new set of plates (the prize) anyway, and it was fun to enter - thank you to everyone who gave me a vote, it is very much appreciated :D

I have just returned from an over night Spa day at a fancy hotel, for my 21st birthday (which isn't until June - any excuse eh?!) so I am nice and relaaaaaaaxed! I hope you're all well and lovely!

Related Posts Plugin for WordPress, Blogger...