Showing posts with label Born Pretty Store. Show all posts

Boots 17 Glisten Nail Art with Fimo Cane Butterflies.

This is the final polish that I bought from the new Boots 17 Spring collection and it's a pinky orangey shimmer called Glisten. I think I prefer how it looks in the bottle more than on my fingers, but it is really pretty in the light. Pink at some angles and shimmery peach at others, it has a really soft and feminine look to it!


I hadn't cracked out the fimo cane in, literally, months so I thought I'd give them a go! I added some yellow fimo cane butterflies from BornPretty.com to the corner of each nail - very simple nail art today! Simply cut a very thin slice of fimo cane with a craft knife and use nail glue to keep it in place! Very spring inspired!


Thanks everyone! Let me know what you think on the comments! Out of Mellow Yellow, Juicy and Glisten, which has been your favourite?

Also did anyone pick up this month's Glamour magazine with the free Percy and Reed haircare?! My hair feels INCREDIBLE! I'd definitely recommend!

Hello Kitty Nail Art!

I have done Hello Kitty Nails once before, but that was just as I was starting out. Seen as I don't get to use the Hello Kitty stamp from the Born Pretty.com (great Nail Art Supplies) promotion very often, I thought I'd dig it out and do an EVEN BETTER MANICURE. Haha. I painted the nails with Natural Collection White and stamped the Hello Kitty image using Konad Black Special Polish. I filled in the bows and noses with pink and yellow and added a coat of Seche Vite. For the accent nail I drew Hello Kitty's face using various Nail Art Pens.

Sorry the photos are a little blurry and dark, I had to take them in my shower because I was out of day light! Sounds odd, but it's the brightest light in the house, and still doesn't do the job!


They came out really cute and are a fun way to wear white nails - which I rarely do! Let me know what you think!

Born Pretty Store also give away 10 of these Hello Kitty Image Plates COMPLETELY FREE, everyday. All you have to do is add it to your cart, and enter the code BP299 at the checkout. To be taken there, you can click on the banner in my side-bar! ----------->

xxx


Review: Brush Set For Nails from Born Pretty Store

A while ago I received a nail brush set from nail art supplies heaven Born Pretty Store. On the website the set is called 3 Lot Acrylic & UV Gel Dual Nail Brush Art Kit Set Tips. Wowza, that are a lot of words for three brushes! Apparently they have multiple purposes, you can use them for applying acrylic nails or gel nails, nail art, etc. I don't have acrylic/gel nails, but I've used them for nail art. They work fine, especially the middle one (which is more rounded than the picture on the website shows btw), I find them a bit too big for small details though.

You cannot only use these brushes for nail art, they're also great for the clean-up! I prefer to use the slanted brush, but all three will work. They're not too small, not too big and they have the perfect flexibility to create a smooth line between the cuticle and the polished area. So if you're looking for decent clean-up brushes or big nail art brushes: give these a try! The price for this set is $3,15.

*The product(s) in this post was/were sent to me for reviewing purposes.
For more information, please check out my Disclosure Policy.

Stars, Skulls, Swirls, Sponging and Stamping. (Giveaway Winner, too)

God, I love it when an alliterative post title comes together.

The whole shabang for you today, I went a little stamp crazy...

All photos in natural light
Please ignore the smudge-tasic index finger! After all that work, there was no way I was re-doing it haha!

I'd been wanting to use the Skull image from the new Bundle Monster Image Plate set for a while, but was in danger of utilizing it to create some kind of gross emo-dream/Pirates of the Caribbean tribute! I decided, in the end, to keep the colours light, and add some swirly pattern and some stars :D

I started with a base of Barry M Turquoise, and sponged on Models Own Blooboo in differing places on the nail. I then repeated this with Silver, from Claire's Silver Nail Art Pen. Now, I've mentioned this before, but however wonderful this silver is (and it is), it gives you the WORST glitter herpes ever. You can scrub and scrub at your silver-stained cuticles but it Just. Won't. Go. Away. So, I apologise for the sparkly cuticles haha! I also added a little bit of Rimmel Sky High to the sponged base too :)

After adding a coat of Seche Vite to smooth it out, I stamped the swirly, planty image from BM225 using Konad White Special Polish onto different parts of each nail. Then, using THIS method, I mixed my own pastel Special Stamping Polishes and stamped some pink, green and purple Skulls from plate BM211. I then did the same with the Star image from BM206, adding them sporadically to make a pattern. I added some coloured rhinestones to the Skull eyes (a later addition - I liked it without, too) that you can get from Nail Art online store Born Pretty.


If people like this look, I may do a sponging/stamping tutorial, because it looks rather busy and difficult, but it's really very simple, when you know how!

Also, I'm going to quickly announce the Giveaway winner (I know it's been a long time coming, soorrryryyyy).
I have contacted her and she's accepted, the winner is...

Lily over at Beauty's Bad Habit!

Congratulations! I'll be posting your goodies after my exams (next week :D)

I used Random.org to select a random number, then simply found that numbered entry in my spreadsheet!

(Didn't want to include your email, Lily!)

So, there we are! My first Giveaway, over and done with! As you can see I had a colossal amount of entries, so they took a while to verify - thank you for your patience, and for entering in the first place!

I hope you enjoy your prize Lily, check out her blog Beauty's Bad Habit!

I also got some great feedback from the giveaway question "What would you like to see from me in the future", so I'll be sharing some of the suggestions with you soon! 

Thanks Everyone!

She's My Cherry Pie

If you haven't been over to www.bornprettystore.com, seriously, check it out! I get a lot of my nail art supplies from there (my brushes, rhinestones, fimo canes etc), because they are so affordable, and it's free international shipping - always a bonus! They often run little contests and give away freebies too, which is great - they're a really customer-friendly company with a wide range of supplies.

I was sent some of their heart-shaped rhinestones to try out,* and was struggling to think of a design to incorporate them into. I've wanted to do a Manicure along these lines for a while, using cherries, and thought I may as well use some of the red heart rhinestones :D

I started with a base of American Apparel Palm Springs, a lovely peach nude, and used a dotting tool to add some red dots in Boots 17 Knockout Red. I added some highlights and shading with Nails Inc Shoreditch High Street and Claire's White Nail Art Pen, and some stalks using Claire's Jade Green and Barry M Spring Green. On the accent nail, I used Born Pretty Store's heart-shaped rhinestones as the cherry fruit, rather than painting them :D


With Flash!


And there we are! Because it's a nude base, it reminded me of cherry pie :D

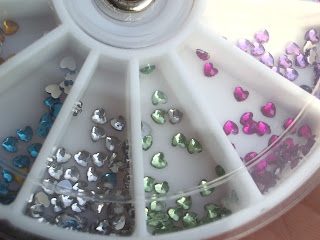
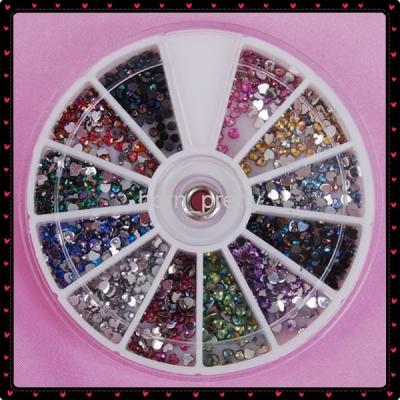
Here is the wheel of Heart Shaped Rhinestones, they come in 12 different colours, and you get around 30 of each colour, I'd say:

my own photo

my own picture - much less in there!
Here is the picture they use on the website:

stock picture

As you can see, the stock picture is rather misleading regarding the amount of rhinestones you actually receive. where the stock picture is jam-packed, the reality is you probably only get half that amount - if that. Nowhere in the item description does it specify how many rhinestones you will receive. This is really the only criticism I have here, as they really are a great product, some people may be disappointed, however.

The packaging is a good idea, the top of the wheel rotates round to reveal each segment at a time, however the rhinestones do become statically charged, and stick to the top, which leads to the colours getting all mixed up. It doesn't really bother me, as I still think it's a better method of storing them than having them stuck to a sheet of acetate, like the Kiss ones I bought from Superdrug. 

The hearts really are sweet, and are a great alternative to regular circular rhinestones - I love them! They're the perfect size, around 2mm, and the range of colours mean you can literally incorporate them into any design.

The wheel costs $3.33 (£2.06), with free shipping, which is fantastically cheap considering the quality and amount you get (even if you are misled in the stock picture!). They also get cheaper the more wheels you buy, for example, if you buy ten wheels, you get a 10% discount.

These took around 2 weeks to reach me in the UK, I'm not sure how long it would be for anywhere else in the world, but the website says to allow up to 4 weeks. The service is great, though, and there's always someone on the email who is quick to reply to enquiries you might have.

To pick up your own set, or check out some more cheap nail art supplies, you can click on the banner at the side of this page :D

Let me know what you think of the nail art, guys! xxxx

*This product was provided by the retailer for review. I am in no way influenced by any affiliation with the company. All opinions are my own, and honest. For full details please read my disclosure policy page

Hello Kitty

Morning everyone! I received my Free Gift Hello Kitty Stamping Plate from BornPrettyStore yesterday, so decided to do a Hello Kitty themed Manicure for your viewing pleasure.
I started with a Skittle-patterned base of Models Own Blooboo, Barry M Strawberry Ice Cream and Elegant Touch White, here is the swatch, as promised! Remember, you can always click to enlarge these photos, if you really want my hand all up in yo' grill.
Pinky and index are Barry M Strawberry Ice Cream, Ring finger is Elegant Touch White, middle finger is Models Own Blooboo. A wee smudge on the pinky but sssshhhhhhh.


I then stamped white polka dots on to all but the ring finger from Konad M79. I stamped the Hello Kitty Image off the BornPretty plate, and filled in the bow and nose in Barbara Daley Neon Pink and Miss Sporty Taxi! respectively. I added a pink rhinestone to the middle of her bow using Nail Glue, and free-handed a silver tip with Claire's Nail Art Pen Striper, topping it with 2 coats of Claire's Holographic Glitter Topcoat. Here's how it came out, all without Flash, in natural light. Colours are accurate.


The glitter is really pretty IRL, it's a shame it was an overcast day today.


you can see a bit of that holo glitter in this one

There we are! Let me know what you think :) I have a habit of running my hands through my hair quite a lot, so the little rhinestones snag and annoy me a bit, but apart from that, I like it! I realise it's not very original and there are a ton of other Manicures like this one out there, but I really wanted to try the new plate, so I'm sure you can forgive me :D

In other news, the Blog Round-up that we took part in yesterday was a success, I hope you got to see some new designs and we helped to broaden your bloggy horizons! Tune in next week where there will be even more collaborators. If you're interested in including some of your artwork, please please get in touch! The more the merrier!

Bundlemonster, the creators and distributors of the image plates I own, are also holding a contest over at their Facebook page so if you own any of their products, get involved! There are 25 prizes to be won! 25! waheeey! I'm definitely going to enter (what have we got to lose....right? Gulp.) so may be asking your valued opinion on a few designs and ideas before submission day!

Anyone else in the UK watching Friday Night Dinner?! I've just watched this week's episode and it made me creeeeaaase! Bloody love it!

In with the Cat Theme of this post (and trust me, there won't be many as I am hideously allergic to the bloody things and have therefore developed a general dislike for any and all feline creatures - except Lions. Lions are sik), Katy Perry has a cat called Kitty Purry - Baaaaahahaahahaaaaaaaa, it's funny cus it's like her name but for a cat, innit.

Finally, Happy Blogiversary to Sam at Nailasaurus :D

Sparkly Fruity Forest

Yeah, that title... don't ask. :i Yesterday I showed you Orly - Enchanted Forest and today I have a spiced up version for you. I sponged half the nail with China Glaze - Emerald Sparkle and the nail tip with Ivanka from Zoya. I love the contrast of the creme base and the sparklies on the tip! Then I added a slice of a lemon fimo cane. You know, for funsies. :D I think the fimo is fun to play around with, cute designs and all, but the thing is: I wish I could slice them thinner. It's so bumpy on the nail and that makes me want to peel it off all the time. If you want to try the fimo canes yourself, you can find them at the Born Pretty Store.

Thanks for watching!

*The product(s) in this post was/were sent to me for reviewing purposes. 
For more information, check out my Disclosure Policy.

Cute Kitty (& Doggy)

Yesterday I showed you the fimo canes I got from Born Pretty Store (a webshop with tons of awesome nail art products). These canes are so.. SO cute! And there are so many of them... I had a hard time deciding which one I'd use first! As you can see I chose a cute pink kitty. On my ringfingers and thumbs I'm wearing Trind - CC117 (inspiring name again.. *sigh*) and on the rest of my nails Wife Goes On from Essie. They're both awesome polishes, really pigmented too, this is two coats with topcoat (and an extra layer of topcoat to seal the fimo slices). The Essie one reminds me a lot of nice sunny days, because I wore it a lot last summer. And as it is really sunny today, I thought it would be a good time to use it again!

Applying the slices of the kitty fimo cane wasn't the easiest thing to do. You have to cut very thin slices, otherwise the fimo won't follow the curve of your nail and make your nail look and feel very bumpy (the surface of your nail will always look/feel a bit bumpy with fimo, unless you're ok with using half a bottle of topcoat of course ^^ ). And I think it's better to use a drop of nail glue instead of topcoat to apply the fimo and make it stay on longer. Ah well, I think these fimo canes are adorable! :L


Our dog is also enjoying the sun today, lol!


Luckily she can look a bit less dumb too... :O


Thanks for watching!!


*The product(s) in this post was/were sent to me for reviewing purposes. 
For more information, check out my Disclosure Policy.

Goodies from Born Pretty Store

I guess most of you heard of the webshop Born Pretty Store. This webshop offers a lot (and with that I mean: a lot!) of lovely nail art products like rhinestones, stickers, dotting tools and striping tape, but they also have makeup brushes, false eyelashes and even contact lenses. Jessica from Born Pretty Store asked me if I would like to review some products.. Well, of course! I love to try out new nail products. :) She was kind enough to send me two polishes, a wheel with coloured half pearls and a lot of fimo canes. I'm so excited about those fimo canes, aren't they cute? I can't wait to try them, especially the fruit designs! 

But first I want to show you swatches of the two glitter polishes I got ($3,51 for 8 ml). The brand name is BO Nail Lacquer (the font on the bottle has a striking resemblance to the font on OPI bottles, don't know what to think about that). When I was looking for a name or a number I found a strange sticker at the bottom of the bottle which says Original Nail Envy. I doubt that these bottles contain OPI's Nail Envy, so what's up with that? Ah well.. No names or numbers then. EDIT: the sticker of the left one says B34 and the right one would be B02, but they don't look the same as the corresponding numbers on the website. So I don't know if the stickers on my bottles are right. 
Enough about the bottles, let's talk about the polishes! I received two glitter polishes, one sheer pink with silver mini glitter and one sheer lilac/mauve with the same silver glitter. They are very very sparkly, love that! They contain so much glitter, the effect is almost metallic. The application was good, but these polishes are both very sheer. Even after applying three coats the smile line of my nail is still visible. I think I'll try layering them in the future.

Sparkly, right? :D I'm happy to tell you I received a code you guys can use to get a 10% discount at www.bornprettystore.com. The code is AMYGK31 and you can use it till March 31st.

Thanks for watching!

*The product(s) in this post was/were sent to me for reviewing purposes. 
For more information, check out my Disclosure Policy.

kelier Crack Polish

I love crackle polish and I'm glad various companies are making them for us.   Jessica over at Born Pretty Store sent me Kelier black crack to review.  The formula is thick on this one.  My basecoat was  semi-dried then I applied one coat of the crackle.  It took awhile I like the crackle effect it gave me.  For some reason it lifted around the tips of my nails. 


This picture I applied one coat of Revlon Color Stay topcoat to seal the tips. Somehow it filled in the cracks making the crackle less noticeable. (hand on chin, hmm)

Here I tried to be a little creative but I'm sure you get the point. Lol!

These pictures I applied Kelier Crackle while my basecoat was wet and waited for it to crack.  No topcoat was applied.  Turned out much better no flaking! 


So the key to applying Kelier Crackle the basecoat must be wet and be patient for it to crack.  To be honest I don't care for this crackle polish.  Do you have this brand?  If so, any helpful tips?

This was sent to me for review 


Until next time please have a great nail polish day. (✿◠‿◠) Share/Bookmark

Dot on Dots

You don't have to be an expert to do nailart.  All you need is some simple tools to help you.  Born Pretty Store have all your nailart supplies.  Painting dots is so much fun.   These 5x2 dotting pens comes in a set with various sizes so that way you can make your dots from small to large.  

I used the green one the small end.  I know my dots look larger then the pen as the paint build up the dots get bigger so if you want really small ones just clean it as you go. 

As you can see I placed 4 pink dots in the middle and placed several white dots around them. 'Simple' 


OPI Ski Teal We Drop
Pink dots: LA Colors Art Deco nailart lacquer-baby pink
White dots: Folkart acrylic paint in white   

If you haven't tried nailart the dotting pens are my recommendation to you. So, go on over to Born Pretty Store and get yourself a set.  Use my code RM10k31 and get 10% off your order.  Discount code expires March 31, 2011

(The dotting pens were sent to me for review)
      
Until next time please have a great nail polish day. (✿◠‿◠) Share/Bookmark
Related Posts Plugin for WordPress, Blogger...